https://pagead2.googlesyndication.com/pagead/js/adsbygoogle.js?client=ca-pub-9463394879326171 crossorigin="anonymous">

Author name: Louis Dioso

Best Paint Colors For Small Bathrooms Without Windows

7 Best Paint Colors For Small Bathrooms Without Windows

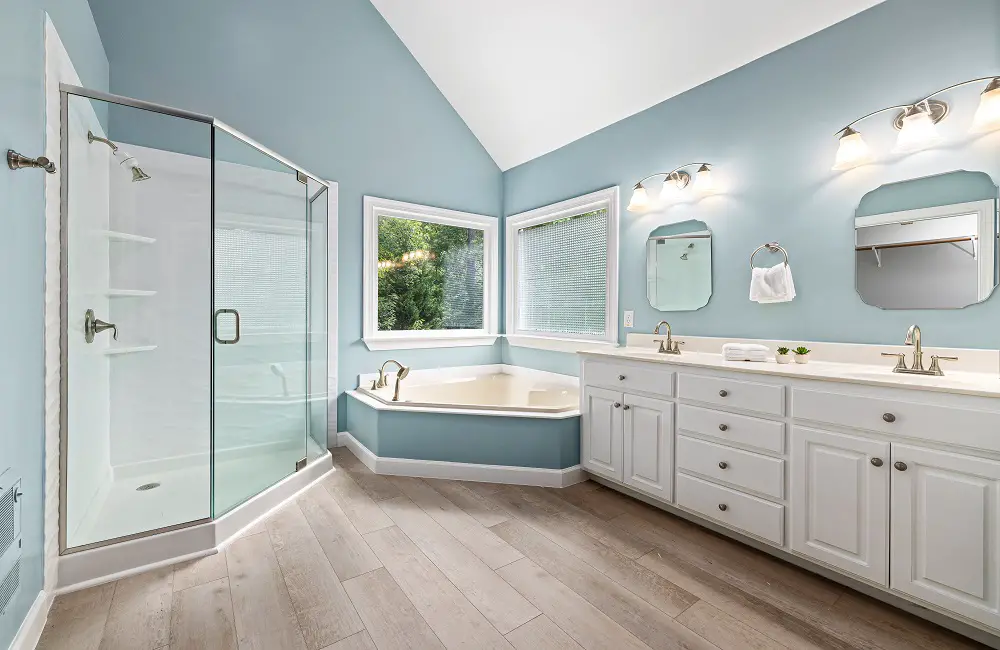
Selecting the right paint colors for a small windowless bathroom can significantly enhance its appearance. If you have a compact, dimly lit bathroom, such as a powder room under the stairs, it’s crucial to choose colors that create an illusion of spaciousness, brightness, and airiness. So what are the best paint colors for a small bathroom without windows? Light and bright colors are highly recommended as they help reflect light. Options like white, neutrals, soft gray or blue, yellow, and blush pink can not only create tranquility but also give an impression of a larger space. For a touch of sophistication, you can consider combining glossy dark colors with lighter shades. Decorating a small, windowless bathroom with no access to natural light might present challenges, but the available paint options can pleasantly surprise you. With the right choice of paint, even the darkest and pokiest bathroom can be transformed into a radiant and attractive space. If you’re interested, let’s delve into the world of colors to explore the best paint options for your small bathroom. Choosing Paint Colors for a Small, Windowless Bathroom When facing the challenge of decorating a small, windowless bathroom, it’s important to consider several criteria that can help guide you in selecting the best paint colors. To facilitate the decision-making process, ask yourself the following relevant questions: What are the Lighting Options in the Bathroom? To ensure proper lighting in bathrooms, it is crucial to consider personal grooming activities that take place in these spaces. The amount of available natural light significantly influences your choice of paint color, as it affects how light is reflected and enhanced. In windowless rooms where natural light is limited to what filters through the open door, it becomes necessary to evaluate the artificial light sources present. Key considerations include: Addressing these factors thoughtfully will contribute to creating a well-lit and comfortable bathroom environment. What Mood Do You Want to Create? When choosing a paint color for your bathroom, it is important to consider the desired vibe or mood you want to create. For instance, if you are looking for a spa-like retreat that exudes serenity and meditation, you may opt for calming shades.  On the other hand, if you enjoy spending long hours in the bath by candlelight, you might prefer a darker color scheme. If the bathroom is meant to accommodate the whole family, it should be functional and friendly, with colors that promote a welcoming atmosphere. Alternatively, if you have a penchant for artistic expression, you can explore patterns and bolder hues to let your creative side shine.  Additionally, it may be worth considering whether the bathroom’s design should align with an existing color palette in the rest of your home. Taking all these factors into account will help you make an informed decision in selecting the perfect paint color for your bathroom. How Does the Paint Look in the Room? When selecting a paint color, it is crucial to consider testing it in the actual room being painted and under the available lighting sources. Keep in mind that the color perception might differ between a well-lit hardware store and a poorly lit bathroom. Taking these aspects into account will ensure a more accurate representation and help you make an informed decision. Best Paint Colors for Small Bathrooms Without Windows 1. White  It’s no surprise that white is the go-to color for small bathrooms without windows. White is light and airy, making it an excellent choice to brighten up the room. It reflects light, making the room appear bigger and brighter. 2. Light Gray  If you want something other than white, then light gray is a great option. It’s still light enough to brighten up the room, but it adds a touch of sophistication to the space. Light gray is a great choice if you want something neutral, but not too stark. 3. Pale Blue  Pale blue is a calming and soothing color that’s perfect for a small bathroom. It’s light enough to open up the room, but it adds a touch of color to make it feel less clinical. Pale blue is a great choice if you want a relaxing and spa-like atmosphere. 4. Soft Green  Soft green is another calming color that’s perfect for a small bathroom. It’s light enough to open up the space, but it adds a touch of color to liven up the room. Soft green is a great choice if you want a natural and serene atmosphere. 5. Sunny Yellow  If you want to add a burst of energy to your small bathroom, then sunny yellow is the way to go. Yellow is a warm and inviting color that’s perfect for a small space. It reflects light and adds a touch of brightness to the room. 6. Light Pink  Light pink is a soft and feminine color that’s perfect for a small bathroom. It’s light enough to brighten up the room, but it adds a touch of color to make it feel less clinical. Light pink is a great choice if you want a soft and romantic atmosphere. 7. Cream  Cream is a warm and comforting color that’s perfect for a small bathroom. It’s light enough to open up the space, but it adds a touch of warmth to the room. Cream is a great choice if you want a cozy and inviting atmosphere. Final Thoughts Choosing the right paint color for a small bathroom without windows can feel overwhelming. But with these 7 options, you can create a space that’s bright, inviting, and tailored to your taste. Remember, the right color has the power to open up a room and transform it into a warm and welcoming space.  Whether you choose white, light gray, or sunny yellow, the color you choose will influence the mood and atmosphere of your bathroom. So take your time, try out samples, and choose the color that’s right for you.

7 Best Paint Colors For Small Bathrooms Without Windows Read More »

Best Calming Paint Colors For Your Bedroom

10 Best Calming Paint Colors For Your Bedroom

When it comes to selecting calming paint colors for the bedroom, there are various options to consider. Both dark and light shades of blue are known for their soothing effects.  Additionally, the recent shift towards earthier tones has made teal, green, and brown increasingly popular choices. Feminine pinks and purples still maintain their trendiness, while white and gray remain staple hues for creating peaceful interiors. It’s important to note that color psychology studies have shown that colors can have a significant impact on our mood. For instance, red is known to be an energizing color, while blue has a calming effect.  Therefore, when choosing the color to paint your bedroom, it’s not solely a matter of design trends or personal preferences. The shade on your bedroom walls can greatly influence the quality of your sleep and how refreshed you feel in the morning. With all of this in mind, let’s delve deeper into the discussion and explore the various colors that can contribute to creating a tranquil ambiance in your home. The 10 Most Calming Paint Colors for the Bedroom According to a recent global survey conducted by the University of Sussex in England, it was found that the majority of respondents indicated blue or green as their favorite color. Interestingly, blue emerged as the most calming color, with teal and pale pink also being popular choices in contemporary bedroom interiors.  It is fascinating to observe how science serves as the foundation for interior design trends, highlighting the importance of color psychology in creating soothing and aesthetically pleasing spaces. Blue When it comes to interior design for bedrooms, blue is often associated with tranquility and serenity, evoking images of the sky and water. Designers typically opt for cooler and lighter shades of blue in bedroom interiors, but it’s worth considering an earthy, saturated blue for a relaxing ambiance. Rich blues can transport you to coastal holidays and infuse your bedroom with nostalgic calm. For a focal point, consider painting one wall with this deep accent shade, while balancing it with lighter colors to prevent the room from feeling too dark. Here are a few rich blues that I recommend: On the other hand, paler shades of blue have long been popular in coastal aesthetics and are perfect for creating a softer look and feel in bedrooms. Pair a pale blue with warm white trim, complemented by wicker furniture and seascapes, to create a dreamy atmosphere. Here are some tranquil shades of blue that you might find appealing: By incorporating blue hues strategically, you can create a peaceful and inviting bedroom retreat. Teal Teal, the gorgeous blue-green hue, is experiencing a resurgence in popularity within the realm of interior design. Glidden and PPG paints have even selected teal as their color of the year, further solidifying its status. Despite perhaps being overlooked during the neutral colors trend, teal remains an exquisite choice for creating spa-like spaces. With its reminiscent connection to water, whether through seascapes or mountain lakes, teal delivers a truly soothing and refreshing ambiance. For creating a serene bedroom setting, consider combining teal with muted greens and blues. If you’re ready to fall in love with a specific teal shade, consider the following enticing options: Embrace the timeless elegance of teal and transform your living spaces into havens of tranquility. Green One way to create a tranquil and rejuvenating space in your bedroom is by incorporating the Japanese practice of forest bathing. This practice involves spending time in lush, green environments, surrounded by the calm ambiance of nature.  To bring this concept into your bedroom, consider using pale green shades such as Vert de Terre by Farrow and Ball, Soft Fern by Benjamin Green, or Avocado Whip by Behr. These ethereal colors evoke the gentle hues found in marshes and moors, and work wonderfully with French and English-inspired interiors.  Pair them with off-white and blush pink accents for a stylish and serene look. To further enhance the botanical feel, take inspiration from the variegated greens of ferns and tropical plants. If you don’t have a garden, don’t worry. You can still evoke the calming power of green by incorporating organic materials and natural textures like wicker, rattan, linen, and wood.  These materials complement the greens beautifully and add depth and visual interest to the space. For a vintage touch, try combining the pale greens with white and brass accents. For a boost of positivity and tranquility, consider shades like Fern Canopy by Behr, Spanish Moss by Krylon, or Green Shimmer by Valspar. These colors will lift your mood while transforming your bedroom into a peaceful retreat. By incorporating these elements, you can create a forest-like oasis within your bedroom, promoting relaxation and rejuvenation in your everyday life. Brown The popularity of leafy greens is closely followed by rich, earthy browns. While many of us associate brown with a vintage mid-century look, these newer shades offer a lush, organic, and spicy appeal. A brown-themed bedroom creates a warm and cozy atmosphere that envelopes you and provides a sense of comfort, much like sipping a cup of coffee or indulging in a bar of chocolate. It pairs beautifully with warm wooden furniture, artisanal leather, woven rugs, and terracotta tiles, creating a harmonious and inviting space. Here are a few warm color options to feast your eyes upon: Consider these warm colors to infuse your living space with a cozy ambiance that exudes comfort and style. Lavender According to trend forecasters, lavender is strongly predicted to be the color of 2023. This delicate shade of purple is not only associated with wellness and sleep but also adds a fresh touch to neutral color schemes. Incorporating lavender into your interior design can create a sophisticated and romantic atmosphere, reminiscent of elegant French interiors. To maintain a sleek and refined aesthetic, it is recommended to pair lavender with sleek white or gray contrasts, avoiding busy floral patterns. For inspiration, you can look to Behr’s “Courtesy,” Farrow and Ball’s “Peignoir,” or Benjamin Moore’s “Lily

10 Best Calming Paint Colors For Your Bedroom Read More »

How To Get Rid Of Bleach Smell After Cleaning

How To Get Rid Of Bleach Smell After Cleaning?

Bleach is known for its powerful cleaning capabilities, effectively targeting even the most stubborn spots. However, its potent odor can be quite overwhelming and can linger for days, making your living space uncomfortable. If you’re wondering how to remove the bleach smell from your house after cleaning, worry no more. We have several tried and tested tips to help you eliminate this unwanted scent. First and foremost, ventilation is key to mitigating the bleach odor. Open windows and doors, and utilize fans to promote airflow. Additionally, consider using air fresheners to help mask the smell.  Furthermore, leaving a bowl of lemon juice, baking soda, activated charcoal, cat litter, or vinegar in the room overnight can be beneficial as these substances are known to absorb unwanted odors, including the scent of bleach. By following these simple yet effective tips, you can ensure that your home is both spotlessly clean and pleasantly scented, without having to compromise on one for the other. What Causes the Bleach Smell? The odor experienced when cleaning with bleach is not actually the bleach itself, but rather a chemical reaction caused by proteins present on the surfaces being cleaned.  It is important to note that with frequent use of bleach, the strength of the smell reduces due to the gradual decrease in protein build-up over time.  However, despite regular cleaning, some individuals may still find the smell of bleach overwhelming.  To create a safer and more pleasant environment for you and your family, let’s explore several effective ways to minimize the lingering smell of bleach in your home. How to Get Rid of Bleach Smells after Cleaning? Ventilate the Area To effectively eliminate bleach smells after cleaning, ventilation is a vital method that should be employed. Open at least one window to facilitate the flow of fresh air into the room. For optimal results, if possible, consider opening multiple windows on opposite sides of the space, allowing air to circulate freely. In case you don’t have windows on multiple sides, an alternative is to briefly open a door, which will enhance the airflow within the area. Expanding on this, utilizing fans can further augment the ventilation process. While pedestal fans are preferable in this scenario, any type of fan will suffice. Strategically position the fans to optimize the airflow and disperse the bleach odor from your home. For an additional freshening effect, you may want to consider mixing a few drops of citrus essential oil with water in a spray bottle. Spray this mixture into the path of the fan to infuse a pleasant deodorizing aroma into the ventilation. Keep in mind that the ventilation process may take a few hours to fully eliminate the bleach smell. If it is not feasible to keep the area open for an extended period, leave it open for as long as possible and repeat the procedure whenever convenient. Use an Air Purifier When looking to purchase an air purifier to eliminate the smell of bleach from your home, it is important to consider various factors. These devices come in different styles and are readily available both online and in numerous stores.  To ensure effective performance, it is recommended to choose an air purifier that can achieve a minimum of five air exchanges per 200 square feet, which is considered standard for an average-sized room. In addition to removing the smell of bleach, air purifiers can provide numerous benefits. They are capable of effectively eliminating allergens present in the air, which can improve indoor air quality and reduce the risk of allergies or respiratory issues. Therefore, investing in an air purifier can contribute to creating a healthier living environment. Use Vinegar When it comes to cleaning agents, it is generally not recommended to mix vinegar and bleach. The combination of these two substances can be dangerous and result in the release of fumes that may cause respiratory issues. Instead, we suggest using vinegar as a means to eliminate the lingering odor of bleach after cleaning. Here are a few safe ways to use vinegar: By utilizing this method, the vinegar will effectively absorb most, if not all, of the bleach smell. It’s worth noting that one downside of this approach is that your home or room may have a slight vinegar odor. However, you can easily address this by following our initial suggestion of ventilating the area. Use Baking Soda Baking soda is a versatile ingredient that is essential to have on hand. Not only can it be used for unblocking drains and cleaning stains, but it is also effective in eliminating unwanted odors from your home. One interesting fact about baking soda is that it can even help absorb the smell of bleach. To utilize baking soda in a room that smells of bleach, simply place a cup filled with baking soda in the freshly cleaned space.  Allow it to sit for a few hours or even overnight to effectively neutralize the odor. This simple yet effective method will leave your room smelling fresh and clean. Use Activated Charcoal or Kitty Litter Activated charcoal and cat litter function similarly to baking soda, effectively absorbing unpleasant odors present in your home. To achieve optimal results, simply utilize a small amount of these substances. For areas that emit a strong bleach scent, place a cardboard box or other suitable container containing activated charcoal or kitty litter within the room.  Allow it to sit for a few hours or overnight. When you return, the space should return to its original, non-bleach-smelling state. This method ensures a fresh and odor-free environment. Lemon Juice Lemon juice is an effective solution for eliminating unpleasant bleach odors in your home and from your hands. To effectively utilize lemon juice for this purpose, create a solution by mixing it with water and transfer it into a spray bottle.  You can then proceed to spray the solution in various areas such as the air, couches, curtains, and other pieces of furniture. For optimal results, consider spraying near fans

How To Get Rid Of Bleach Smell After Cleaning? Read More »

How To Dry A Carpet Fast After Cleaning

How To Dry A Carpet Fast After Cleaning?

To ensure the cleanliness and freshness of your carpets, it is crucial to incorporate regular cleaning into your routine. Carpets enhance the luxurious and comfortable atmosphere of our homes; however, no one appreciates a dirty or foul-smelling carpet. The inconvenience lies in the extended drying time associated with carpet cleaning. If you find yourself wondering how to expedite the carpet drying process, we have uncovered several useful techniques to accomplish this task with minimal effort. Typically, carpets dry naturally within six to twelve hours.  However, there are measures you can take to expedite this timeframe. First and foremost, ensuring proper ventilation is key. Additionally, choosing to wash your carpets during hot and dry weather conditions can aid in speeding up the drying process.  Utilizing fans, dehumidifiers, air conditioners, heaters, professional blow-dryers, and wet/dry vacuums can also contribute to faster drying. Lastly, increasing the frequency of carpet cleaning can help maintain a faster drying time overall. In the event that you need to clean your carpet in a hurry and don’t have the recommended time to wait, we have compiled some of the easiest and most effective tips for fast carpet drying. 8 Simple Tips to Dry a Carpet Fast after Cleaning When you have finished cleaning your carpet, it is important to allow sufficient time for it to dry completely. Typically, carpets will remain wet for a considerable period, ranging from six to twelve hours.  During this time, it is advisable to avoid walking on the wet carpet to prevent any additional dirt or grime from accumulating. This is particularly crucial if you desire a flawless end result and wish to avoid the hassle of dealing with additional stains or marks on your carpet. To expedite the drying process and achieve a quicker turnaround, there are several strategies you can employ. While nature itself is undoubtedly the most effective carpet dryer, it is worth noting that it is not always predictable.  Therefore, we recommend relying on natural drying as your primary approach. However, we also have a few additional suggestions to offer in case you need them. Without further ado, let us delve into the various techniques and methods to expedite the drying of your carpet following a thorough cleaning. Mother Nature To effectively dry a wet carpet after cleaning, ventilation plays a crucial role. Opening doors and windows to create a cross breeze is an excellent way to expedite the drying process. For optimal results, consider opening one side of the windows slightly wider to enhance the cross breeze.  It’s worth noting that this method works best in warm or hot, sunny, and dry weather conditions. In contrast, if the weather is humid, cloudy, or rainy, this approach may introduce additional moisture into the room, prolonging the drying time.  To ensure a seamless drying experience, it is advisable to schedule carpet cleaning on a day that is expected to be warm, sunny, and dry. By following these guidelines, you can expect your carpets to dry effectively and efficiently. Use Fans During unexpected weather changes, such as rain affecting your carpets, there are several steps you can take to address the situation. Begin by closing your windows and doors to minimize further moisture intrusion.  Since a ceiling fan is most effective, utilize it first. However, if you don’t have one, gather pedestal and desk fans and position them strategically around the room with the wet carpet, ensuring they are set to maximum speed.  By simulating natural airflow patterns, you can facilitate the drying process by creating a cross-breeze and removing moisture from the carpeted area. Air Conditioner When it comes to the issue of using air conditioners in rooms with wet carpets, it may initially appear counterproductive. The cooling effect of air conditioners can indeed create a chilly environment. However, it’s worth noting that air conditioners also have the ability to extract moisture from the air. By employing an air conditioner in a room that has a wet carpet, you are essentially facilitating the drying process of the air within the space. The removal of moisture from the air establishes a sort of vacuum effect, aiding in the moisture extraction from the carpet. While this method may not yield immediate results like warm air or fans, it does offer significant assistance. Moreover, it ensures that your carpet doesn’t remain excessively damp for an extended period of time. It’s crucial to understand that carpets that retain moisture for prolonged periods can become breeding grounds for mold and mildew. The growth of these unwanted organisms can lead to exacerbated health problems for individuals with allergies and asthma. Additionally, it can result in unpleasant odors within your home and cause stains on the carpet. To determine if your carpet is thoroughly dry after utilizing an air conditioner, switch off the AC and allow the room to return to its average temperature. Subsequently, test the carpet by touching it with clean, dry hands. This step will help you assess the level of moisture remaining in the carpet and gauge if further drying is required. In summary, while using an air conditioner may appear counterproductive initially, it proves to be an effective method for drying wet carpets. It prevents the development of mold and mildew, eliminates foul odors, and prevents stains. By following the mentioned steps, you can ensure that your carpet is adequately dried and maintained. Dehumidifier Dehumidifiers are highly effective in removing moisture from the air, making them a quick and efficient solution for drying carpets after cleaning. Operating similarly to air conditioners, dehumidifiers extract moisture from the air and either dispose of it through a drain or collect it in a storage tank.  If your dehumidifier has a storage tank, it is recommended to monitor it periodically during the drying process, as carpets typically retain a significant amount of water that will be accumulated by the dehumidifier. A Professional Blow-Dry Many reputable carpet cleaning companies provide a blow-drying service as part of their cleaning package. This additional service is offered when

How To Dry A Carpet Fast After Cleaning? Read More »

Things That Make Your House Look Cheap

15 Things That Make Your House Look Cheap

When it comes to selling your house or enhancing your living space, it is crucial to avoid a cheap-looking aesthetic. While most of us have budget constraints and cannot splurge on expensive decor, there are still ways to upgrade your home. One key factor that can make your house look cheap is clutter. Additionally, certain features and fixtures can also contribute to a cheap appearance. These include budget flatpack and DIY furniture, poorly positioned lighting, awkwardly sized rugs, haphazard flooring, lack of artwork or mass-produced artwork, overwhelming themes, improperly installed unlined curtains, and vertical blinds. By addressing these aspects and making the necessary improvements, you can elevate the overall look and feel of your home while staying within a limited budget. This will ensure that your space exudes a more sophisticated and appealing atmosphere. 15 Things that Make your House Look Cheap Cluttered Entrance Hall The initial impression that individuals form of your house often lingers, potentially shaping their perception. A disorganized entryway can create an ambiance of low quality, disorder, and unwelcoming atmosphere. Are your children accustomed to leaving their footwear scattered around, bags piled haphazardly against the wall, and dog toys strewn across the floor? To address this, consider establishing a dedicated area near the entrance equipped with practical storage solutions, such as enclosed shoe racks and a lidded bench. By implementing these measures, your entrance hall will exude a refined and sophisticated appearance, leaving a lasting positive impression on your guests. Cluttered Kitchen Upon observing interiors featured on Instagram or in magazines, one cannot help but notice the absence of clutter in the kitchens. A refined and sophisticated appearance is achieved through clear countertops, closed cabinet doors, and unoccupied window sills.  Should one find themselves overwhelmed by an excess of possessions, it may be prudent to reduce the quantity of crockery. As a personal example, I recently discovered an excessive accumulation of eight salad bowls in my cupboard, which proved excessive for my family of three. Flatpack Furniture Flatpack furniture is widely regarded as an affordable option. However, one of the challenges is that it can look inexpensive, especially when used for outfitting entire homes with matching sets. Consequently, while flatpacks may serve well in certain situations like first apartments or garage storage, they tend to exhibit low quality and uninspiring design choices. DIY Furniture Creating pieces for your home can be a satisfying endeavor, particularly if you possess carpentry skills. In addition to the personal satisfaction, upcycling second-hand pieces can offer a rewarding experience and financial savings. This is especially true when you have acquired the knowledge of furniture restoration techniques. However, it’s worth noting that the creations of weekend DIYers and crafters can occasionally lack charm. While a single homemade piece in a room can add a lovely and personal touch, a room fully furnished with pallet furniture or poorly repurposed knickknacks could appear cheap and unappealing. Disproportionate Furniture Properly selecting furniture that is appropriately sized for a room is vital to avoiding a cheap and haphazard impression. This involves intentionally designing the space by carefully coordinating furniture pieces that complement each other.  It is advisable to invest in high-quality furniture and exercise patience in order to wait for the right piece that perfectly fits the room’s aesthetic and functionality. Too Much Furniture Having an excessive amount of furniture in a home can indeed give it a cheap and tacky look. When a space is overcrowded, it creates a sense of clutter and disorganization, instantly detracting from the overall aesthetic appeal. In addition, it can also indicate a lack of thoughtful design and curation. Moreover, an abundance of furniture may be associated with lower-quality or inexpensive pieces. When items are packed too closely together, they appear cramped and can emphasize any flaws that may be present. To avoid this, it is important to prioritize quality over quantity. It is recommended to carefully select furniture that is proportional to the size of the room. Additionally, ensuring that there is ample open space for easy movement and visual breathing room can greatly enhance the overall ambiance of the space. Bad Lighting When it comes to choosing the right lighting for your space, it’s crucial to consider various factors. Selecting the wrong lighting can result in either harsh overhead lights that cause eye strain or a dimly lit room that hampers visibility. Neither of these options creates a sophisticated ambiance for your home. To ensure optimal lighting, a general guideline is to have at least three sources of light in each space. These sources can include windows, overhead lights, and lamps (such as floor or table lamps). In rooms with limited natural light, it becomes even more important to augment the lighting. While some may believe that adding more ceiling lights can solve the problem, the truth is that typical “boob” light fixtures fall short in providing enough light and often create a budget look. Overhead lighting alone tends to cast downward shadows, which can further darken a room. To counteract this effect, it is crucial to supplement overhead lighting with lamps that direct light toward the ceiling, instantly brightening the space. Alternatively, recessed downlighting can provide a softer and more diffused light. Avoid the temptation of using stick-on strip lights as a solution. They often fail to adhere securely to the walls, resulting in a shabby appearance. Instead, consider incorporating stylish lamps. Even if you’re in a rental property, you can still update the light fixtures to create a more elegant ambiance. By following these principles and carefully considering your lighting choices, you can transform your space into a well-lit, inviting environment that exudes both functionality and sophistication. Haphazard Flooring The floors of a house play a significant role in creating an inviting and visually appealing space. Polished wooden floors, bathed in sunlight, exude a timeless beauty, while worn-out and grubby wall-to-wall carpeting can diminish the overall aesthetics.  When considering flooring options, factors such as texture, color, and material should be taken into account, as these

15 Things That Make Your House Look Cheap Read More »

How To Cover Windows Without Curtains

How To Cover Windows Without Curtains?

When it comes to window treatments, draperies have traditionally been a popular choice for adding coziness to a room. However, if you’re looking for something different, there are several curtain alternatives that can enhance the aesthetic appeal of your space. Some notable alternatives to traditional curtains include roller, tie-back, cellular, and Roman shades. Additionally, you can opt for Venetian or vertical blinds, as well as cornices, barn and plantation shutters, or screens. For a unique touch, you may consider replacing the window with leaded or stained glass or using window film to create a frosted or decorative effect. It’s worth mentioning that interior designers classify window treatments as either hard or soft, depending on the materials used. Examples of hard window treatments include those made from wood or metal, while soft window treatments typically involve fabrics or paper. Taking all these options into consideration, you can effectively choose an alternative to curtains that suits your taste and complements your space. Don’t leave your windows bare; explore these alternatives to find the perfect window treatment that adds both style and function to your home. Soft Window Treatments Curtains and drapes are excellent examples of soft window treatments that serve multiple functions. They provide privacy, with options like sheers or net, and effectively block light and sound using heavy drapes. Moreover, curtains offer an aesthetic appeal, adding color, interest, and softness to any room. Now, let’s explore some other alternatives to curtains among various soft window treatments available in the market. Roller Blinds Soft blinds, also known as shades, are window treatments that consist of a length of fabric, vinyl, bamboo, or woven seagrass. They are attached to a curtain rod fitted within the window frame, precisely covering the window. To regulate the amount of incoming light, these blinds utilize a lifting mechanism, such as a cord, to raise the fabric, which then rolls up around a rod. With this mechanism, you have the flexibility to adjust the shade to any desired height, thus controlling the light entering the room. One of the advantages of roller blinds is the wide variety of materials they are made from, making them suitable for any type of decor. For a home office or a more functional setting, you can opt for a reasonably priced, mass-produced blind. On the other hand, for a more elegant dining room, you can choose bespoke patterned blinds with customized pulls to add a touch of sophistication. Furthermore, it is worth noting that roller blinds can be integrated into a smart home system, allowing for automation. These automated blinds often possess blackout properties and provide additional perks like thermal insulation and soundproofing qualities. Roman Blinds Roman blinds, also known as shades, are a versatile window treatment option. Unlike other types of shades, such as bamboo, Roman blinds are crafted from a heavier fabric, giving them a more substantial feel. When open, these blinds lie flat, and when raised, they fold up horizontally into elegant pleats. Roman blinds strike a perfect balance between curtains and louvered blinds. They offer a wide range of patterns and colors, reminiscent of curtains, but with the advantage of using minimal material, making them a cost-effective choice. Additionally, they can be customized with embellishments, binding, and trim to match any interior style. In terms of shape, Roman blinds exude sleek minimalism, offering a lighter alternative to draperies while still providing functionality and light control. Similar to roller blinds, Roman blinds can also be customized as blackout treatments, ensuring privacy and darkness when desired. Cellular Shades The blind-shade family includes another member known as the cellular shade. These soft pleated fabric blinds can be crafted from various materials such as paper, lace, and bonded polyester. With a unique cellular honeycomb design, these blinds are perfect for those who prioritize environmental consciousness.  The cell shapes in these blinds trap air, providing insulation for your home and enhancing energy efficiency. Additionally, cellular blinds are available in a range of options, from light-filtering to full blackout shades. In terms of aesthetics, cellular blinds offer a neat and minimalist look that complements clean interiors. While they may lack the soft touch of Roman blinds, they are not as overtly functional as louvered blinds. All in all, cellular blinds make a practical and stylish choice for any home. Window Film Window film is a budget-friendly alternative to curtains that can be directly applied to glass surfaces. These adhesive films are not only durable and robust, but also easy to remove, making them an ideal option for rental spaces.  Furthermore, they can be easily cut to fit any window size and are available in a variety of finishes, such as frosted and stained glass, allowing you to control the amount of light that shines through. Plants An alternative method of window covering, aside from using curtains, is to utilize tall potted plants positioned on the windowsill. Additionally, you can opt for hanging trailing plants in baskets above the window. These ideas provide both visual appeal and privacy while still allowing natural light to filter through. Hard Window Treatments For individuals accustomed to the billowing delicacy of muslin curtains or the cozy heft of velvet drapes, transitioning to hard window treatments may initially feel unfamiliar. Nevertheless, it is worth exploring these practical and attractive alternatives that allow you to dress your windows without relying on traditional curtain styles.  By considering various options, you can find innovative solutions that refresh the aesthetics of your space while ensuring functional benefits. Venetian Blinds Venetian or horizontal blinds, which are made of wood, plastic, or metal slats suspended on strips of tape or cords instead of fabric, are a popular choice for window coverings. These blinds offer a range of light control options, allowing you to rotate the slats inwards and outwards using a cord or rod, and you can even overlap, open, raise, or lower the entire blind. One of the advantages of Venetian blinds is their affordability, making them a cost-effective option for many homeowners. Additionally,

How To Cover Windows Without Curtains? Read More »

Best Paint Colors For Kitchen Walls

8 Best Paint Colors For Kitchen Walls

When it comes to spending time in our kitchens, whether you’re an avid baker or someone who sticks to microwave meals, practicality is key. But kitchens are not just functional spaces; they often serve as gathering places for family and friends.  Therefore, choosing the right paint color for your kitchen walls is crucial in creating a warm and welcoming atmosphere that reflects your personality. So, what are the best paint colors for kitchen walls? To achieve a fresh and trendy look, draw inspiration from nature. Sky blues, spring greens, sage greens, and creams are popular choices for cooler and lighter shades. If you prefer warmer hues, consider buttery yellow or pinky terracotta. For a more dramatic and cozy feel, shades like navy, moss green, and chocolate brown can transform your kitchen into a sanctuary. Since a complete kitchen renovation occurs only about once a decade in my house, I like to keep the space inviting and up-to-date by simply changing the wall color. It’s incredible how a fresh coat of paint can instantly update tired walls and set the mood for the entire room. Now, let’s explore the trending paint choices for kitchens and discover the latest kitchen paint color options. 8 Best Colors To Paint Kitchen Walls Sky Blue Blue, being the most significant color trend for 2024, continues to be inspired by the natural world. It infuses tranquility into our homes, reminiscent of a summer sky or a peaceful forest lake. When it comes to kitchen colors, sky blue is an ideal choice. It not only portrays a sense of calm but also brings freshness reminiscent of a spring morning. This makes it perfect for a practical and busy space where your day begins and ends. Sky blue is a versatile color that works well in various kitchen styles, including English and French country-style, cottage-core, or vintage kitchens. You can pair it with white or gray cabinetry for an airy and light-filled room. For those seeking drama, navy blue or charcoal features can be combined with sky blue. Notably, sky blue is suitable for a family kitchen, providing comfort and energy for kids going off to school. It also creates a serene spa-like atmosphere for serious cooks who prioritize a composed mindset when tackling complex recipes. If you are considering using sky blue paint in your kitchen, you may want to explore the following stunning colors of the year: Incorporating sky blue into your kitchen design will undoubtedly bring a touch of serenity, clarity, and contentment. Dark Blue Dark and moody shades are becoming increasingly popular in kitchen interiors, replacing the traditional notion that painting a small room white is the best choice. This trend creates a cozy sanctuary in the kitchen, with darker shades like navy, indigo, and midnight blue imparting a dramatic and contemporary effect. For a truly immersive experience, consider applying a single inky shade to the entire room. Alternatively, you can create contrast by keeping the walls moody and opting for cabinetry in bold and contrasting colors. Consider bright navy and white for a vibrant look or go retro with a bottle green or orange. Here are a few options for bold kitchen colors: By embracing these bold color choices, you can transform your kitchen into a stylish and visually impactful space. Moss Green Green is an indispensable inclusion in any list of natural shades. This year’s paint colors embrace the abundant hues of leaves, stems, and flowers. Moreover, kitchens are blooming with the infusion of trendy green tones. If you have concerns that green might lend a juvenile appearance to your kitchen, put those worries aside. This season’s colors exude a sense of sophistication and offer more subdued variations. Think of mossy and moody greens reminiscent of ivy or French garden furniture. Like blue, green possesses a calming aura and is associated with positive attributes such as growth, health, and wellness. It serves as the perfect backdrop for any interior design, seamlessly blending with charming vintage, minimalist, or traditional aesthetics. Moss green can even be treated as a neutral shade, complementing it with white, natural wood, or striking marble slabs. To add a dash of modernity to your kitchen walls, consider selecting one of the designated colors of the year for 2024: If you prefer the timeless classics, the following options may suit your taste: Spring Green The kitchen offers an excellent opportunity to experiment with vibrant colors. Enhance the overall ambiance by painting the walls a refreshing shade of green. Opt for a fruity hue instead of overwhelming neon or chartreuse options. For a Scandi kitchen, consider pairing leafy green shades, such as apple or celery, with white and blue accents. In a more traditional kitchen, these shades can exude a sleek and sophisticated aura when combined with warm wood and brass accessories. Here are a few delectable shades of green that you might find appealing: Sage Sage is an incredibly soothing color choice for a kitchen, lighter than moss and slightly more subdued than spring green. This understated shade effortlessly combines vintage charm with the current eco-chic trend. Personally, I adore how sage pairs with the natural textures of wood, wicker, and pots of herbs. Additionally, it offers a whimsical charm when contrasted against bolder shades like cobalt, teal, or terracotta against the muted walls. Considering the wide range of sage shades available, I have carefully selected a few options for you: Terracotta When it comes to natural colors for your kitchen, it’s not always about the bright and vibrant options. Consider wrapping your kitchen in rich shades inspired by clay, soil, and stone, also known as earthy colors. One excellent option is terracotta, which has become a popular alternative to the traditional fire-engine red. This paint color offers a unique blend of energy from red and the softness of brown, creating a warm and inviting atmosphere ideal for family kitchens. Terracotta is commonly used for tiles and is particularly well-suited for Mediterranean and South-West interior styles, as well as

8 Best Paint Colors For Kitchen Walls Read More »

How To Declutter After The Holidays

How To Declutter After The Holidays? 7 Easy Tips!

The night of Christmas can often feel anticlimactic, as guests and family members depart, leaving behind remnants of wrapping paper and scattered bows. The stacks of gifts needing a designated place in my home evoke a sense of melancholy. Interestingly, I used to dread the post-Christmas decluttering process. However, as the years went by, I discovered the importance of approaching it with composure. Moreover, I have learned that pre-organizing and decluttering before Christmas can significantly reduce the effort required for the post-holiday cleanup. In light of my experience, I wanted to share some useful decluttering tips so that you, too, can realize that tidying up after the festivities is not an insurmountable task. 7 Easy Tips on How to Declutter After the Holidays Extra Dishes After the conclusion of the Christmas dinner, a diligent group of family members promptly convene to collectively tackle the task of dishwashing. This proactive approach enables us to promptly stow away the infrequently used dinnerware, thereby streamlining our post-holiday kitchen decluttering process.  Furthermore, we meticulously store our cherished China and other specialized serving dishes, reserved solely for the Thanksgiving and Christmas festivities. Wrapping Paper and Bows To effectively declutter after Christmas, start by collecting all the discarded wrapping paper, ribbons, and used bows. This simple action not only eliminates waste but also provides clarity on further tasks.  As a helpful strategy implemented in our household for several years, we strategically place a few empty waste paper cans in the living room where gift unwrapping takes place.  This ensures that everyone can easily dispose of their wrapping materials and bows while unwrapping their gifts, significantly reducing the time spent cleaning up the resulting debris. Prepare the Gifts You Need to Return or Exchange When it comes to gifts, there often seems to be items that are either not useful to the recipient or new clothing that doesn’t quite fit or has the wrong color. Sometimes, it may even be something you already own.  In such instances, it is advisable to create a pile with these unwanted gifts and keep the receipts handy. This will allow you to promptly exchange or return the undesired items. Afterwards, make a point to visit the appropriate stores at your earliest convenience to process the necessary exchanges or returns. Sort Through Your Christmas Decorations as You Take Them Down As you prepare to wrap up the holiday season and carefully pack away your cherished Christmas decorations until next year, it’s important to allocate some time for organization and decision-making. Firstly, I like to start by evaluating the ornaments and decorations that were not utilized during the current Christmas season. I carefully assess each item, considering its potential for future use. Anything that hasn’t been used for a year or two is then separated and categorized into a designated pile for disposal or donation. Next, I methodically go through the old lights, garlands, and tinsels, making sure to discard anything that no longer meets the visual standards or specifications. Finally, as I gradually dismantle the Christmas tree, I carefully assess each piece and add any worn out or unwanted decorations to either the disposal or donation pile. This approach ensures that everything within my decoration storage boxes is primed and ready for use in the following year. Organize Unused Wrapping Paper and Ribbon After organizing and storing the actual Christmas decorations, I proceed to arrange and put away the unused but still in good condition wrapping papers, ribbons, and bows.  For better preservation, if feasible, it is recommended to pack these items in durable plastic containers, ensuring their freshness is maintained for future use. Sort Through Your Kids Broken Toys If you have children, then it is likely that they will receive new toys for Christmas. However, it is common for children to already possess a substantial number of toys, some of which may no longer be used or may even be broken and unusable. If your children are older, involving them in the process of sorting through their toys could be beneficial. On the other hand, if your children are younger, it may be better to declutter their toy collection when they are not present. Young children often hesitate to part with any toy, even if they have lost interest in it. When my sister’s kids were young, we would take the opportunity to declutter their toys during the week before Christmas break while the children were at school. This decluttering process would take place before the new toys were unwrapped, allowing the kids to simply put them away once they had been opened and played with for a while. Get Ready For New Clothes In our family, receiving clothing as a gift has always been a cherished tradition. As individuals, each of us adults tends to indulge in shopping and treat ourselves to new clothes, making the surprise of receiving clothing we wouldn’t have chosen ourselves all the more exciting. However, for some members of our family, this means making space for the new additions by decluttering our dresser drawers or closets. Decluttering your clothing collection is a simple yet effective process. Take the time to go through your dresser or closet, or both, and identify items that are worn, stained, or no longer worn. If you have recently decluttered your closet and dresser to prepare for the fall and winter seasons, you may not need to repeat the process unless you have made new clothing purchases. However, for those who find themselves with a surplus of clothes that exceed their needs, decluttering becomes essential in order to make room for new clothing items. Final Thoughts Decluttering after the holidays may not be a favorite chore for everyone, but with the tips and tricks I’ve acquired over the years, I’ve managed to simplify and ease the process. By implementing these strategies, post-holiday decluttering can become less stressful and more manageable. I hope that you will find these tips helpful in your own decluttering endeavors.

How To Declutter After The Holidays? 7 Easy Tips! Read More »

How To Get Rid Of Paper Clutter

How To Get Rid Of Paper Clutter? 7 Simple Ways

Eliminating paper clutter from your home can be a challenging task that requires consistent efforts. Despite decluttering, it often recurs within a few days, making it seem like a never-ending process.  However, there are effective steps you can follow to permanently eliminate paper clutter and maintain a clutter-free home. 7 Easy Tips on How to Get Rid of Paper Clutter Cut Down on the Junk Mail You Receive To minimize paper clutter caused by receiving excessive junk mail, such as catalogs and flyers from various businesses, consider opting out of multiple mailing lists. By doing so, you can significantly reduce the amount of unsolicited mail you receive. Furthermore, many companies now provide the option to access their catalogs online instead of receiving physical copies. Taking advantage of this alternative can greatly contribute to maintaining a tidy and organized living space with less paper clutter in your home environment. Purge those Take Out Menus If you and your family frequently indulge in take-out food, it’s likely that you have accumulated a drawer full of take-out menus. However, modern-day restaurants mostly publish their take-out menus online, making the physical menus unnecessary.  Therefore, it is advisable to declutter your drawer space or kitchen counters by discarding those paper menus that serve no purpose other than occupying valuable space. Instead, make use of the readily available online versions for a convenient and streamlined take-out experience. Go Paperless for Bank Statements and Paying Bills Over time, the accumulation of monthly bank statements and checks from bill payments can become overwhelming. However, you have the option to eliminate paper clutter by opting for online bank statements and bill payments.  By electing to receive your statements digitally and automating your bill payments, you can ensure timely payments without any concerns about potential late fees or missed due dates. This streamlined approach not only reduces paperwork but also offers convenience and peace of mind. Consider Recycling Old Newspapers and Magazines If you are someone who derives great pleasure from reading newspapers or magazines in their physical form instead of online, it is essential that you responsibly recycle them.  Take the initiative to locate the nearest local recycling center and make a consistent effort to transport those outdated newspapers and magazines.  By doing so, you will effectively prevent the accumulation of paper products within your household and contribute to conserving the environment. Scan Documents Whenever Possible When you acquire a new product accompanied by directions or other essential paper materials that you wish to preserve, you have the option of reducing the accumulation of physical documents by scanning them. By scanning these documents onto your computer or a disk, you can digitize and centralize the information, allowing for easier access and retrieval whenever needed. This method ensures that you won’t have to search through your belongings in an attempt to locate a pamphlet tucked away in a drawer. Moreover, this approach offers the convenience of compact storage and eliminates the risk of misplacing or damaging the physical documents. Additionally, digitizing these materials not only promotes an organized and clutter-free living space but also contributes to reducing environmental waste. Hence, by leveraging scanning technology, you can efficiently store and manage important product-related information, enhancing accessibility and streamlining your document management process. Have a Set Place to Keep Incoming Bills It is common for many individuals to quickly check their mail and haphazardly place incoming bills on random surfaces such as a stand, table, or any convenient location nearby. To establish a more organized approach, it is recommended to designate a specific and consistent location to store these bills until they are paid. This designated area can be a drawer or a purpose-built holder that can be securely mounted on the wall or placed in a convenient yet contained spot. As an example, I know of someone who uses an old napkin holder on their desk to keep their incoming bills neatly organized. By implementing this simple practice, you can maintain a structured system and ensure that your bills are managed efficiently. Organize All the Papers You are Keeping Investing in a small file cabinet is a wise decision to keep all your important documents organized.  By keeping copies of your income tax or any other necessary paperwork in one central location, you not only reduce paper clutter in your home but also make it easier to locate the documents you need, exactly when you need them.  Moreover, remember to periodically purge your files to ensure optimal organization and efficiency. Final Thoughts Eliminating paper clutter can be a challenging task that often leads to feelings of overwhelm. However, by implementing the following straightforward tips, you can effectively declutter your space and maintain an organized and clutter-free home environment for the long term.

How To Get Rid Of Paper Clutter? 7 Simple Ways Read More »

How To Organize Tupperware

How To Organize Tupperware? Easy Guide!

Properly organizing food storage containers, including Tupperware, can be a significant challenge in achieving efficient kitchen organization. These containers often occupy excessive space, resulting in frequent spills and lost pieces.  However, there is good news – there are effective strategies and techniques available to simplify and streamline the organization of Tupperware, making it a much more manageable task than you might expect. Why Tupperware is So Hard to Store? Tupperware containers are often a challenge to store efficiently, leaving many individuals with an unbalanced ratio of bottoms to tops. The difficulty arises from their space-consuming nature and the unfortunate tendency for pieces to become separated or misplaced.  This issue is further compounded when other members of the household are unsure how to handle these seemingly miscellaneous items during the cleaning and organizing process.  To alleviate these challenges, it is crucial to establish a well-defined organizational system that ensures effortless household cooperation and preserves the integrity of your Tupperware collection. How to Organize Tupperware – Easy Ideas for Storing Tupperware Store Your Lids Vertically To effectively store your lids in your cabinet, it is crucial to be mindful of their storage method. Lids often have a tendency to disappear and can quickly go missing. Therefore, instead of haphazardly tossing your lids, a recommended method is to store them vertically.  This allows for easy access to the desired lid without the risk of all the lids tumbling out and getting lost in the cabinet. Stack and Nest Your Containers Once you have separated your lids and containers, arrange them in a stacked formation to optimize space utilization and facilitate easy retrieval of desired items.  Tupperware containers, specifically bowls, can be nested inside one another, enabling efficient stacking and organized storage that prevents accidental spills or cabinet clutter. Sort Lids and Containers by Size When organizing and storing your Tupperware containers, it can be helpful to sort them by size. By placing larger containers at the bottom and smaller ones on top, you can effectively nest them together, optimizing storage space.  This not only reduces clutter but also makes it more convenient to locate the desired container and corresponding lid when needed. Consider Attaching Lids to Containers and Stacking This option is highly effective when you have a limited number of Tupperware pieces to store. For efficient space utilization, you can neatly stack the smaller ones inside the larger ones.  By doing so, you can optimize the storage capacity and ensure a clutter-free storage solution for your Tupperware collection. Use Your Kitchen Drawers Instead of the Cabinets An effective method for storing your Tupperware is to neatly stack the smaller pieces inside the larger ones and place them in a convenient drawer. By employing this technique, you eliminate the risk of items toppling over when you reach for what you need from the cabinet.  Consider keeping frequently used pieces in the drawer to enhance the efficiency of your daily routine. This approach simplifies your life and helps you maintain an organized kitchen. Split Your Lids and Containers Up To streamline the organization of numerous Tupperware containers, consider separating the lids and containers into designated spaces. Keep the lids in a designated drawer in your kitchen, ensuring they are easily accessible and less prone to misplacement.  Meanwhile, allocate the containers in your cabinets, optimizing storage based on their size and dimensions. This approach offers a systematic and efficient solution for managing your Tupperware collection. The Best Tools for Organizing Tupperware Drawer Dividers  One of the most challenging aspects of Tupperware organization is finding enough space to store all those containers and lids. That’s where drawer dividers come in! By using drawer dividers, you can create compartments for each container and lid, making it easy to keep them separated and organized within a single drawer. You can find drawer dividers in a variety of materials, including bamboo, plastic, and metal, so you can choose the one that best fits your needs and aesthetics. Pull-Out Shelves  If you don’t have enough space in your drawers for all your Tupperware, consider adding pull-out shelves to your cabinets. These shelves work just like a drawer, but can be installed in your existing cabinets. You can purchase pre-made pull-out shelves or customize them to fit your unique needs. By using pull-out shelves, you’ll be able to see all your Tupperware at once, making it easy to find the container or lid you need. Clear Containers  Another great tool for Tupperware organization is clear containers. Instead of storing each container and lid separately, you can use clear containers to group them together. For example, you can store all your containers in one clear container and all your lids in another. This will make it easy to keep track of everything and quickly find what you need. Plus, clear containers will provide a clean and cohesive look to your kitchen storage. Lid Holders  Tupperware lids can be particularly challenging to keep organized. That’s why lid holders are a great option! Lid holders can be attached to the inside of a cabinet or on the wall. They typically have slots of varying sizes to accommodate different lid sizes. By keeping your lids organized and easily accessible, you’ll never have to search for the right lid again. Lazy Susans  If you have a lot of Tupperware and lids, consider adding a lazy Susan to your cabinet or pantry. Lazy Susans are rotating trays that make it easy to access items in the back of a cabinet or pantry. By using a lazy Susan for your Tupperware, you’ll be able to quickly find and access everything you need. Plus, it’s a fun and creative way to add some functionality to your kitchen storage. Final Verdict I hope my tips will help you organize your Tupperware. You need to organize your Tupperware so that you will have a clean and organized kitchen.

How To Organize Tupperware? Easy Guide! Read More »

Scroll to Top