https://pagead2.googlesyndication.com/pagead/js/adsbygoogle.js?client=ca-pub-9463394879326171 crossorigin="anonymous">

Kitchen And Dining

cute-white-modern-kitchen-ideas

15 Cute White Modern Kitchen Ideas For You

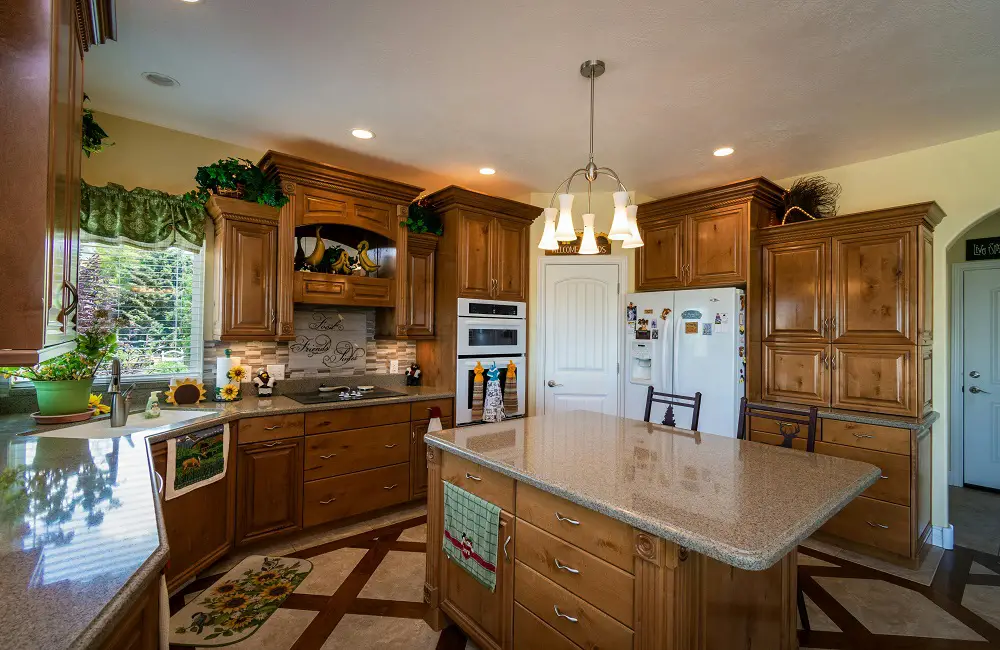
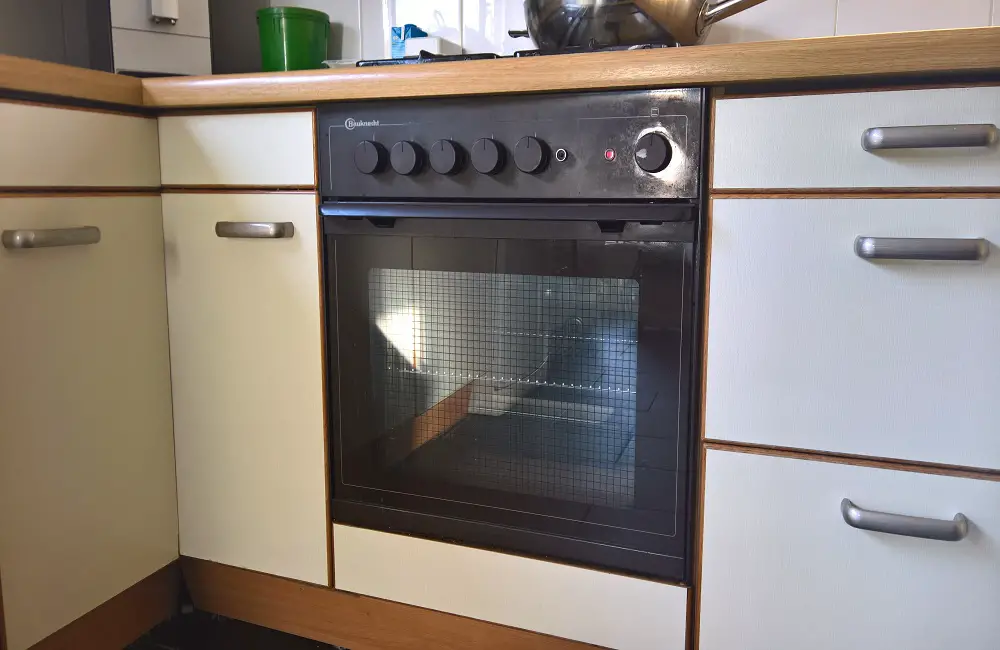
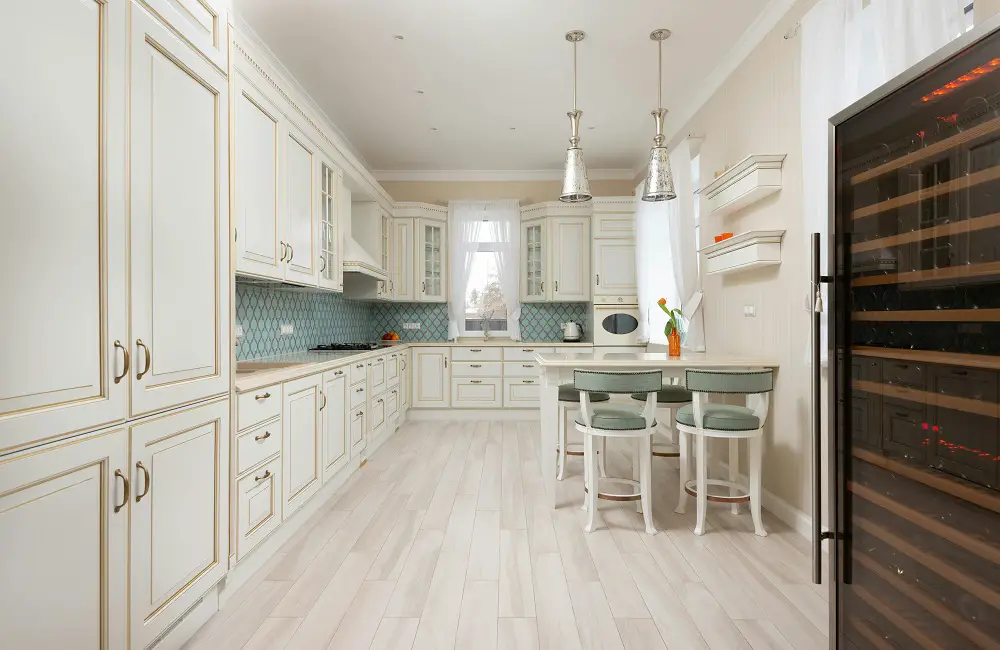
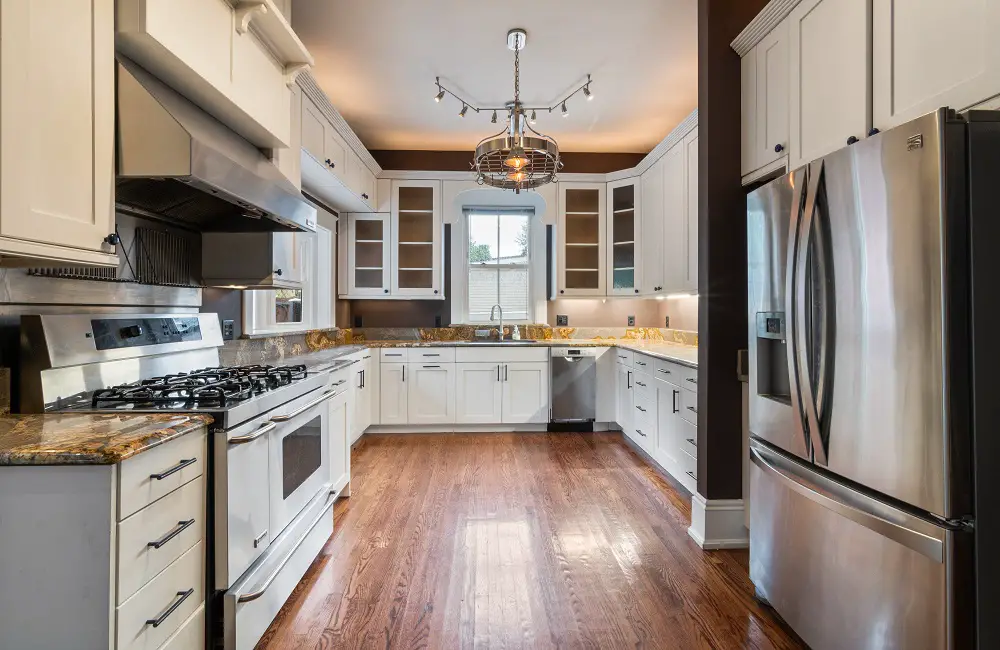
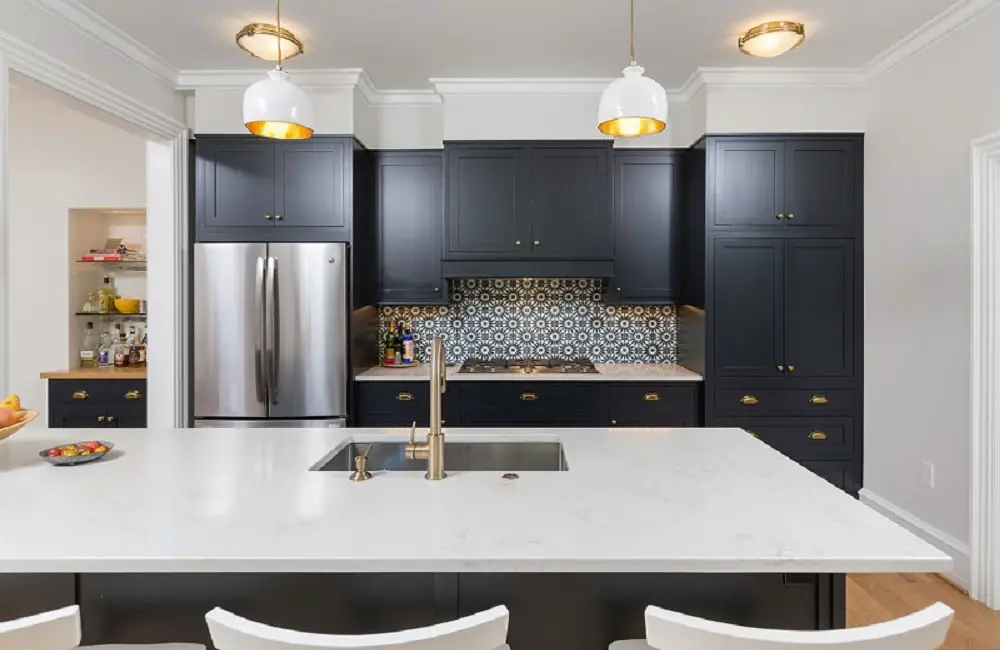
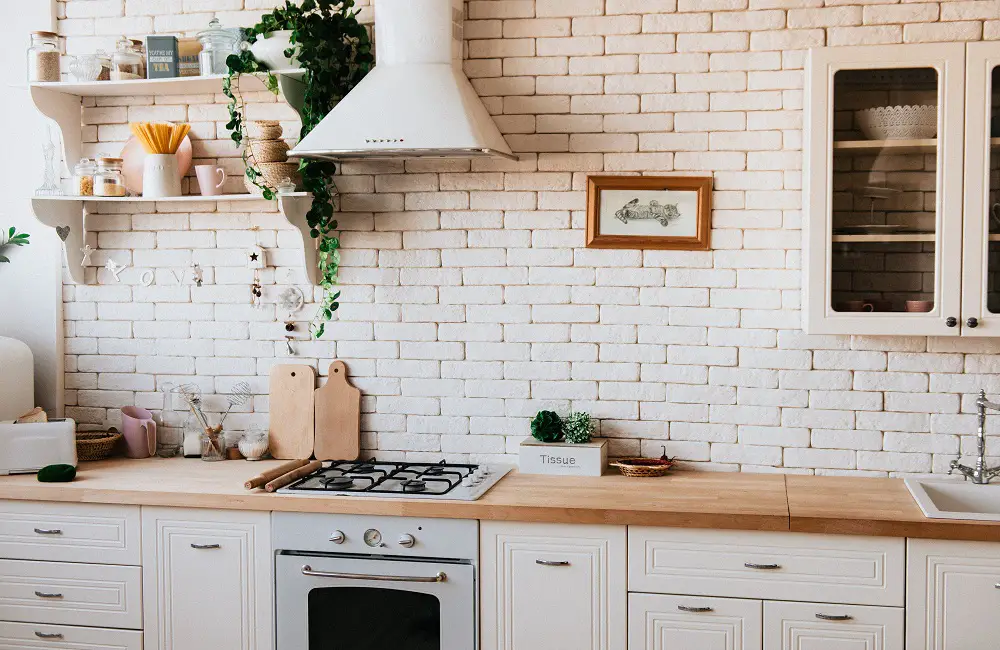
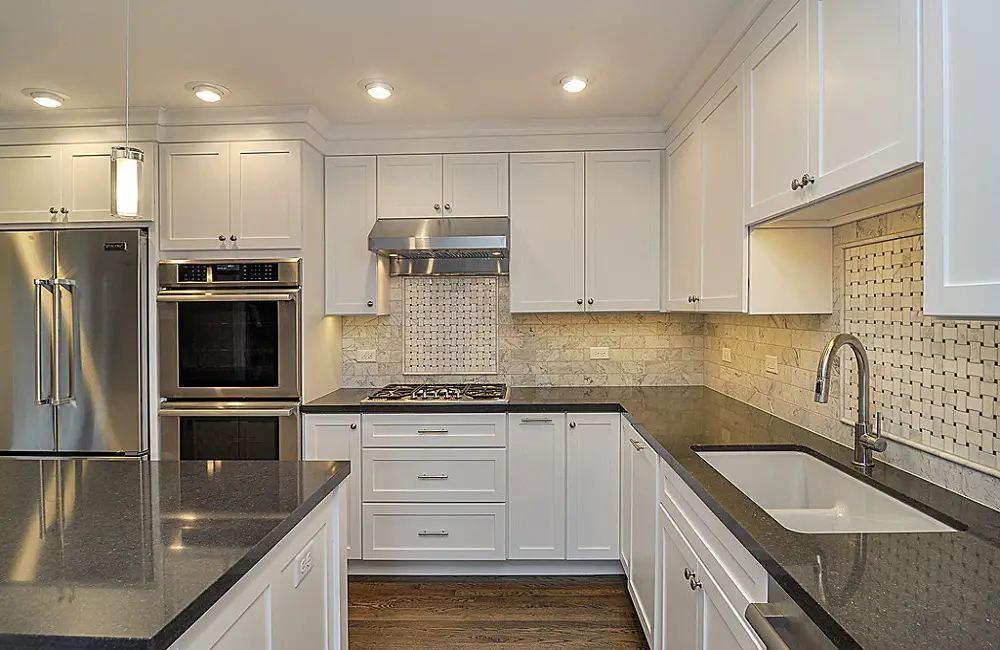
The majority of individuals think that a white finish is ideal for modern kitchen ideas. One of the primary reasons people like this kind of lovely setup is that it has an airy, clean appeal that makes you smile. This style of kitchen. It’s crucial to optimize the kitchen’s appearance and bring it up to date with contemporary standards if you want to be sure it’s the right one for you. Let’s examine the top white modern kitchen designs and the reasons behind our selection as the best choices at this time. Beautiful White Kitchen This is where you should start if you’re looking for a stunning white kitchen because of its incredibly serene finish. It has that contemporary look you’re striving for, and we think it’s one of the most amazing finishes available right now. Anyone who wants an airy finish knows that this is where they need to start. It will be a light-colored, refreshing choice with the desired airiness and ease on the eyes. Charming White Kitchen With Black Accents You should think about the accents when looking at the greatest white modern kitchen designs. These finishing touches are what will tie everything together and finish the kitchen’s overall design. You’ll be looking at visually pleasing black accents in this white modern kitchen idea. These will be a welcome change of pace that fulfills your desires. Airy White Kitchen Would you like an idea for a large white kitchen? For your space, we would investigate this one thoroughly. Its freshness is the main reason we adore this white modern kitchen idea. It is stylish, airy, and clean—all the qualities that one needs in a modern choice. We think it’s critical for a white kitchen plan to satisfy your wants, and you will get exactly that right here. You won’t be let down, and you’ll be pleased with how polished everything looks.  Elegant White Kitchen Because it must uphold the image you are looking for, the majority of people will be concerned about how sophisticated the white kitchen is. There are many different approaches to take when doing this, but this white modern kitchen idea has it all. This, in our opinion, projects a stunning picture that will inspire confidence in you and not let you down. Every square inch of the white modern kitchen will exude elegance and natural beauty for you to appreciate. Cozy Farmhouse White Kitchen Would you prefer to adopt a more rustic look? There is nothing wrong with the fact that many individuals will wish to choose this road, as we know! We recognize the beauty of this aesthetic, and once everything is put in place, it won’t let you down. As soon as everything is set up, it will be serene and you will relish every second of it. It’s a simple, endearing alternative with the dazzling brilliance you want from a modern white kitchen. Minimalist White Kitchen Do you not want the white modern kitchen plan to have too much going on? This is the point at which you should give careful thought to a minimalist design language, like the one you will find here. You will be captivated by the simple design, which will also be as tidy as you desire. This is essential to the work you are performing and the arrangement of the scene. Concentrate on the simple layout and have faith in the setup’s overall worth. Spacious White Kitchen A large white kitchen that suits your demands will establish the tone for your activities and the benefits you derive from them. We think it’s essential to the white kitchen design idea you’re going to be searching for. This will provide more visible space in the kitchen, which is equally as vital as physical space. We think you’ll be won over by a white kitchen that appears open. With time, it will leave a fantastic first impression. Textured White Kitchen We think this is one of the list’s most original white modern kitchen ideas, and we really love it. This is distinct because of the textured finish, which appeals to people who have high standards for the appearance of their kitchen. You’re going to smile since the texture gives the white modern kitchen idea a little more dimension. This is how you are going to improve the kitchen’s design. This white kitchen plan is intended to have a customized appearance, which is what will make the area appealing to you. Gorgeous White Kitchen One of the most stunning white modern kitchen ideas you will find on this list is this one, which is definitely a winner. It is roomy, pleasant, and serene. You won’t be dissatisfied if you are picky about the white kitchen’s appearance and like to concentrate on overall beauty. It’s going to be a huge success from the off, which is what initially made it so amazing. White And Gold Kitchen Which color scheme are you aiming for? The option to go with a white and gold kitchen will be enjoyable for you. This is the kind of kitchen that will appear amazing and be exactly clean that you desire. A gold and white finish is always appealing. You will love spending time in it throughout the day since it will scream quality. For people who are concerned with selecting the ideal design, this is why it’s such a fantastic kitchen idea. Timeless White Kitchen With Stools Stools are a frequently overlooked component of white modern kitchen designs. The stools here, in our opinion, will look the part and win you over. Make sure you choose a classic design that exudes beauty by giving it some thought. This type of bold design is eye-catching and empowering. Warm White Kitchen Would you like a modern white kitchen that is cozier? You’re going to fall in love with this one. It’s stylish and has a welcoming atmosphere that will make it enjoyable to be there. This is a hospitable design for a modern one. Chic White

15 Cute White Modern Kitchen Ideas For You Read More »

French Farmhouse Kitchens

15 Stunning French Farmhouse Kitchens

I’m a huge kitchen fan; it’s my favorite place in the house. They are what I fantasize about, stare at, and drool over the most. As you know, I’m also a fan of French style. So combining the two is total perfection for me! French farmhouse kitchens are generally more rustic in style. They differ, of course, but they usually share rustic elements such as bare wood beams, textured tiling, and worn brick or stone. Furthermore, they usually lack top cabinets or use a variety of cabinet colors or styles. This results in a lovely blend of rustic and sophisticated elegance, as well as a kitchen that appears to have evolved over time. 

15 Stunning French Farmhouse Kitchens Read More »

How To Clean An Oven

How To Clean An Oven Easily? Here’s How!

Maintaining a clean and sanitary kitchen is critical for both the performance of your appliances and the health of your family members. Among the many kitchen appliances that must be cleaned on a regular basis, many homeowners find cleaning the oven to be particularly difficult.  Grease, food spills, and baked-on residue can accumulate over time, reducing oven performance and posing health risks. However, with the appropriate technique and a few helpful hints, cleaning your oven does not have to be a difficult task. In this tutorial, we’ll look at practical methods and strategies for cleaning ovens, so you can keep your kitchen clean and attractive for cooking and baking. Whether you’re dealing with minor surface grime or stubborn, baked-on stains, learning the art of oven cleaning will have your equipment shining and ready for your culinary adventures. What You’ll Need: Step-by-Step Instructions for Cleaning Your Oven 1. Remove the wire racks Before cleaning the interior of your oven, remove the racks, especially if it is self-cleaning. The self-clean cycle works by raising the temperature inside the oven to an extremely high level (some ovens reach 900° F!) in order to burn off any remaining food and fat. While your oven’s racks are designed to endure high cooking temperatures, these temperatures are too much for the racks, causing irreversible damage. 2. Remove any loose food bits from inside your oven After removing the wire racks, use a moist rag or sponge to wipe any stray food and grease from the oven. 3. Run the self-cleaning cycle or apply the oven cleaner if your oven doesn’t have a self-clean cycle If you’re utilizing an oven’s self-cleaning cycle, you can skip this step. To reduce odors and smoke build-up, keep several nearby windows open and your kitchen exhaust fan running during the cycle, if you have one. If you can’t recall the last time you ran a self-clean cycle, the aromas generated will most likely be unpleasant, but you shouldn’t leave your house until the cycle is complete. For ovens without a self-cleaning cycle, follow the guidelines on the label of your preferred oven cleaner. Many of them should sit for a while to remove stuck-on dirt and grease. Never spray oven cleaner on your oven while it is in the self-cleaning cycle. 4. Wash wire racks in the sink While the oven is self-cleaning or the oven cleaner is performing its magic, clean the racks in the sink with warm, soapy water. Use a cleaning sponge or scouring pad to remove tenacious muck and grime off the racks. Then, rinse and air dry them until you’re ready to put them back in the oven. If the racks are very unclean, soak them overnight in a cleaning like Carbona 2-in-1 Oven Rack and Grill cleaning. 5. Clean up debris or oven cleaner inside the oven After the self-cleaning procedure has completed and the oven has totally cooled, use a moist sponge or rag to wipe the ashy food bits from the oven’s bottom. If you used an oven cleaner, now is the time to remove it with a wet sponge and rinse the interior with water. 6. Replace the wire racks and clean the glass window Finally, return the racks to the oven and clean the glass window, inside and out, with a degreasing multipurpose cleaner or glass cleaner and a microfiber cloth to ensure a streak-free finish. Use a non-scratch scrub sponge to remove any stuck-on grease splatters. Can I clean my oven with baking soda? Many others suggest using a baking soda paste to clean the interior of your oven, but we don’t. It’s filthy and takes extra scrubbing and rinsing, and who wants to spend two days cleaning their oven? Baking soda is moderately abrasive and works well as a spot cleaner in the oven, but we do not recommend using it to clean the entire oven. Other DIY cleaners, such as baking soda mixed with vinegar or lemons in an oven-safe tub of water, work similarly. While these may be effective cleansers, and we understand the reluctance to use oven cleaners due to fumes and strong odors, it is simply far easier to utilize an oven’s self-cleaning feature or a cleaner designed specifically to clear the burnt-on items left behind in ovens. And modern oven cleansers differ greatly from previous models. Many products are designed to emit fewer or no emissions. How to keep an oven tidy between deep cleanings Just because you know how to clean your oven successfully doesn’t mean you shouldn’t strive to avoid making a mess. As a general guideline, cover pots with lids or aluminum foil to avoid splatters, and lay baking sheets on the bottom racks when baking pies and casseroles to catch any that may boil over. As soon as you detect a spill, carefully sprinkle table salt on it while it is still warm to absorb it, then wash it up with a moist sponge or towel once the oven has cooled.

How To Clean An Oven Easily? Here’s How! Read More »

10 Cheap And Easy Ways To Make Your Kitchen Look Expensive

10 Cheap And Easy Ways To Make Your Kitchen Look Expensive

Are you prepared to improve the look of your kitchen without going over budget? You’re going to be in for a treat if so. In this post, we’ll look at ten easy, affordable methods to upgrade the appearance of your kitchen without breaking the bank.  Prepare yourself to learn how to turn your kitchen into an upscale refuge, regardless of whether you’re an experienced do-it-yourselfer or just looking for quick yet efficient improvements. 1. Update hardware Hardware has the power to drastically alter the appearance of furniture, and your cabinets are no exception. Change the pulls on your cabinets and drawers to give your room an instant makeover. 2. Use lighter colors Light-colored walls and cabinets instantly brighten a room, giving the impression that it is larger and hence more expensive. Light hues are known to reflect light and cover over a plethora of imperfections, such as dents, dings, and scratches on your existing cabinets. 3. Replace cabinet doors Your kitchen will look sleeker and more modern if you replace worn-out cabinet doors with new ones or sand and refinish the ones you already have. For a splash of glitz, add glass or glossy doors; alternatively, leave some spaces without doors and install open shelving to showcase your finest items. 4. Change lighting Pendants and chandeliers are the ideal addition to brighten your kitchen and alter the atmosphere of the area. Most houses and apartments come with standard lights that are all the same. Change things up by adding some personality or an unexpected touch to the space that gets the most use in your home. 5. Use artwork In your kitchen, artwork will have the same uplifting effect as it does in any other space. Go large and aggressive without fear; it will provide the impression of a larger area. Renters who don’t have the freedom to make all the changes they’d like to can also benefit greatly from art. 6. Paint your appliances stainless steel Appliances made of stainless steel not present? Not an issue. If your appliances are still functional but give the appearance of being outdated, consider updating them with a paint-on stainless steel finish. Take caution—various kinds of liquid stainless steel are produced by different firms based on the appliance and its intended purpose. 7. Add window treatments Makeover the appearance of your windows to instantly improve the aesthetics of your kitchen. Adding fashionable window treatments gives your home’s focal point more personality in addition to a dash of elegance. You can customize the ambience to your preferred style with a limitless array of alternatives, from elegant shades to beautiful curtains. Accept this easy yet powerful renovation to give your kitchen a fresh look. 8. Style your breakfast nook Consider adding a variety of components to your breakfast area to give it more flair and charm. Incorporate throw pillows with eye-catching designs or luscious materials to give your seating arrangement character and coziness. Add even more visual interest to the table by decorating it with a visually arresting centerpiece, like a gorgeous vase full of seasonal fruits or a carefully chosen assortment of candles.  To add a splash of color and energy to your morning routine, you may also introduce fresh flowers or greenery to the area to provide a refreshing touch of nature. These well-considered upgrades not only improve the area’s visual attractiveness but also provide your breakfast area a warm, inviting atmosphere that makes it a great place to begin the day. 9. Replace an old decorative elements Replace stale ornamental pieces with eye-catching new ones to breathe new life into your space’s design. For a modest yet significant alteration, try switching up your usual fruit dish for an elegant tray or a gorgeous ginger jar.  A ginger jar’s delicate curves and elaborate patterns can lend refinement and classic beauty to your décor, while a well-designed tray serves as a stylish platform for showcasing your most prized possessions. You may revitalize your surroundings and give your area a fresh lease on life by making these easy replacements. 10. Hide small appliances Clutter is what downgrades a room the most. Avoid having tiny equipment like coffee makers, blenders, and toasters on your counter. When you wish to use them, removing them is not too difficult. Final Words In conclusion, it doesn’t have to be costly or difficult to upgrade your kitchen into an opulent area. You may improve its appearance and feel without going over budget by using these ten simple, inexpensive ideas. There is something for every taste and budget, ranging from easy changes like switching out the hardware and painting the walls a brighter shade to more imaginative fixes like hanging artwork and adding window treatments. Why then wait? Put these suggestions into practice right now, and you’ll enjoy a completely renovated kitchen that feels and looks luxurious without breaking the bank.

10 Cheap And Easy Ways To Make Your Kitchen Look Expensive Read More »

How To Arrange Appliances In Your Kitchen

How To Arrange Appliances In Your Kitchen?

The organization of kitchen appliances is dependent upon the cooking preferences of individuals. One’s frequent use of specific appliances determines their storage in kitchen cabinets.  For example, raw food enthusiasts often prioritize keeping their blender within easy reach. Vegans tend to prioritize quick access to their pressure cooker, while meat-eaters prioritize their slow cooker and indoor grills.  Regardless of one’s cooking preferences, there are four important steps in the process that should be followed for effective organization and functionality of kitchen appliances. Pare Down Your Appliances When it comes to decluttering and organizing your kitchen appliances, it’s crucial to start with the first step: grouping them by use. Categorize them into three groups – frequently used, rarely used, and never used. In cases where kitchen storage space is limited, it becomes even more important to allocate it wisely.  This can be achieved by owning appliances that serve multiple purposes. Take a closer look at your appliances, ensuring that their uses are versatile and not limited to just one function. For instance, consider investing in a high-quality blender that can also function as a food processor. Additionally, evaluate the necessity of owning a panini press if you already have a waffle iron. Furthermore, a stockpot can perfectly cook rice, making a separate rice cooker redundant unless it is part of your daily routine. Banish Your Never-Used Appliances One common issue that many people face is the reluctance to let go of unused appliances. While it may seem like a simple decision, it can often be the most challenging step in decluttering your kitchen.  Consider appliances such as rice cookers, juicers, or egg poachers. If you frequently utilize these appliances, it is prudent to keep them. However, if you have never poached an egg or made a green juice, chances are you will not do so in the future. It is important to assess and allocate your kitchen cabinet storage space for appliances that you genuinely use and benefit from. Donate or Recycle the Appliances You Never Use Unused kitchen appliances can easily find a new home through various avenues. One option is to donate them to a local charity such as Habitat for Humanity, Goodwill, or a local church or house of worship. This not only helps you declutter, but also gives someone else the opportunity to use and appreciate the appliances. Another option is to sell them online platforms like eBay or through a garage sale. In case the appliance is no longer in working order, recycling is a suitable solution. You can check with your local recycling centers to find out if they accept kitchen appliances. Additionally, another option is to donate them to Freecycle, where they can handle the recycling process for you. If you’re uncertain about whether to keep or get rid of an appliance, you can try using the box method. Simply place the appliance in a box and store it out of sight. If, after a month, you find that you still need the appliance, then it’s worth keeping. However, if you never think about it during that time, then it’s probably time to donate, recycle, or sell it. Cut Cabinet Clutter In order to optimize the functionality and accessibility of your cabinets, it is crucial to ensure they are well-organized and easy to navigate. This will contribute to a streamlined and efficient workflow, allowing you to quickly and effortlessly locate items when needed. By implementing effective organizational strategies and utilizing appropriate storage solutions, you can maximize the available space and improve overall efficiency in your storage system. Move Rarely-Used Kitchen Appliances To Storage It is advisable to reserve valuable counter-top or low-cabinet space for frequently used kitchen appliances. For those that are used less often—such as blenders (unless you are a dedicated smoothie maker), food processors, waffle makers, ice cream makers, and slow cookers—it is recommended to store them on a higher shelf.  By doing so, you can optimize your kitchen storage and keep these appliances readily accessible for occasional use, while keeping your countertops clutter-free and organized. Store the Appliances You Use All The Time When it comes to storing kitchen appliances, there isn’t a one-size-fits-all approach. Each individual’s organizing and storage system will depend on their cooking style, the appliances they frequently use, and the available cabinet space in their kitchen. Once you’ve identified the regularly used appliances in your kitchen, it’s important to store them in easily accessible areas. Here are three general guidelines to consider: place frequently used appliances on the countertop or the lower shelf of an upper cabinet to ensure convenient access; reserve the top cabinets for rarely used appliances; and consider selling or donating appliances that are never used. While striving for a clean and clutter-free countertop is a common objective, don’t hesitate to keep some commonly used appliances – such as a coffee maker, blender, or toaster oven – visible and easily accessible on your countertop. Remember, effective kitchen organization involves optimizing the functionality of cabinets, pantry, refrigerator, and appliances themselves. Maintain and Upgrade To maximize efficiency in your kitchen, it is recommended to frequently organize your kitchen appliances. By doing so, you can significantly reduce the time required for each season. It is advised to conduct this task at least twice a year. For an even more meticulous approach, consider labeling your cabinet doors. This additional step can further enhance the organization and accessibility of your kitchen items. Final Thoughts When it comes to organizing kitchen appliances, it may initially seem like a daunting task. However, the effort put into creating a streamlined and functional kitchen is undoubtedly worth it. By ensuring that each appliance finds its rightful place, even if it means parting ways with that juicer you’ve never used, accessing the toaster oven in the morning or air frying a chicken for a delicious dinner becomes a breeze. This simple yet effective organization system allows for greater efficiency and convenience in your culinary endeavors, making your kitchen experience all the more enjoyable.

How To Arrange Appliances In Your Kitchen? Read More »

Dirtiest Places in Your Kitchen

8 Dirtiest Places in Your Kitchen

The kitchen, a space highly regarded as the central hub of the home, serves as both a nourishing sanctuary and a creative hub for culinary enthusiasts. However, amidst the comforting familiarity of this bustling haven, lie inconspicuous hotspots that harbor hidden dirt and germs.  In this enlightening exposé, we aim to shed light on the eight most notorious areas in your kitchen that are often overlooked and unsuspectingly become breeding grounds for harmful bacteria.  We strongly encourage you to delve deeper into these under-recognized culprits and to promptly address the potential health risks they pose—a paramount task in maintaining a clean and hygienic kitchen environment. 8 Dirtiest Places in Your Kitchen Behind and Beneath Appliances It is important to maintain cleanliness not only on the surfaces of kitchen appliances, but also in the often overlooked areas behind and beneath them. Over time, refrigerators, ovens, and dishwashers can accumulate layers of grime, creating an ideal breeding ground for germs.  To prevent the buildup of dirt in these hidden spots, it is recommended to periodically pull out these appliances and thoroughly clean the surrounding areas. By doing this, you can ensure a hygienic environment in your kitchen and minimize the risk of contamination. Under the Sink The space under the kitchen sink is a commonly crowded area that houses cleaning supplies and dishwashing essentials. Unfortunately, this space is also prone to mold and mildew growth due to factors such as leaky pipes or residual water from cleaning activities.  The accumulation of moisture creates a damp environment that provides optimal conditions for these unwelcome invaders.  To maintain a healthier kitchen environment, it is essential to periodically declutter and thoroughly clean the under-sink area, thereby preventing mold growth and ensuring cleanliness. Trash Can and Bin Area Regularly disinfecting the trash can and cleaning the bin area are crucial steps in maintaining cleanliness and hygiene. In addition, using liners provides an extra layer of protection against germs and helps prevent foul odors.  Neglecting to address these areas in regular cleaning routines can result in the buildup of food residues, liquids, and general waste, creating an environment conducive to bacterial growth.  By incorporating these simple practices into your cleaning routine, you can effectively combat germs and keep unpleasant smells at bay, ensuring a clean and sanitary space. Cabinet Handles and Knobs Regularly cleaning cabinet handles and knobs is crucial for maintaining a clean and germ-free kitchen. These frequently touched areas can accumulate a surprising amount of dirt and bacteria due to the combination of natural oils from hands and residue from the kitchen.  To prevent the spread of germs, it is recommended to wipe down cabinet handles and knobs with a disinfectant on a regular basis. By taking these additional steps to keep your kitchen clean, you can ensure a healthier and more hygienic environment. Light Switches Light switches are an essential component in every room that should not be overlooked during routine cleaning. Due to frequent hand contact, light switches can become reservoirs for germs, posing a potential health risk.  To maintain a more sanitary kitchen environment, it is crucial to incorporate these frequently touched surfaces into your regular cleaning routine. Consider using disinfectant wipes to effectively eliminate germs and maintain cleanliness. Dish Drying Rack It is important to pay attention not only to cleaning our dishes but also to the dish drying rack, which can often be overlooked as a potential source of germs. When we leave moisture behind on the rack, it can lead to the growth of mold, which can then transfer onto our freshly washed dishes.  To prevent this, it is recommended to regularly clean and thoroughly dry the dish rack, ensuring the removal of any moisture and preventing the buildup of mold. By doing so, we can maintain the cleanliness and safety of our kitchenware. Reusable Grocery Bags Reusable grocery bags, although praised for being eco-friendly, can actually harbor hidden germs. This is because these bags come into contact with a wide range of surfaces, such as shopping carts and kitchen counters, leading to the accumulation of bacteria.  To prevent potential sources of contamination in your kitchen, it is important to regularly launder or wipe down these reusable bags. By doing so, you can effectively eliminate any harmful bacteria and ensure a hygienic environment for your food preparation. Pet Feeding Area In households with furry companions, it is important to recognize that the pet feeding area may serve as an unexpected breeding ground for bacteria. If not cleaned regularly, pet bowls can accumulate food residues and become a haven for germs.  To safeguard the health and well-being of both your pets and your family, it is recommended to incorporate the cleaning of pet bowls into your routine for maintaining a hygienic kitchen environment.  By implementing this simple yet vital step, you can ensure the optimal care and safety of your beloved pets. Final Thoughts As we explore the vast culinary landscape of our kitchens, it becomes crucial to be ever-vigilant of the concealed nooks and crannies that may unwittingly harbor dirt and germs.  In order to promote a cleaner and healthier kitchen environment, let us address eight commonly overlooked areas.  By doing so, we can guarantee that the heart of your home remains an impeccably safe and inviting space, ensuring the well-being of all who enter its hallowed confines.

8 Dirtiest Places in Your Kitchen Read More »

How To Keep Your Fridge Smelling Fresh Naturally

How To Keep Your Fridge Smelling Fresh Naturally?

Experiencing an unpleasant odor when opening the refrigerator is a common occurrence. It can be puzzling to identify the source of the foul smell, even after conducting a thorough search. Moreover, the unpleasant odor may persist even after removing spoiled food items.  However, there are simple and effective methods to deodorize your fridge and ensure a consistently fresh scent. By implementing these techniques, you can enjoy a pleasant and inviting refrigerator environment at all times. How Do You Clean And Deodorize A Refrigerator? To ensure effective odor elimination, it is imperative to begin by thoroughly addressing the basics. Failing to do so will render any subsequent deodorizing attempts futile. Clean the inside To effectively remove stuck-on food, spills, and neutralize odors from your refrigerator, follow these steps for natural disinfection: By following these steps, you can effectively disinfect your refrigerator, ensuring cleanliness and preventing odors. Fresh coffee grounds To efficiently deodorize your refrigerator, follow these steps: Place 1 cup of fresh coffee grounds in a bowl, jar, or on a plate at the back of your fridge. The coffee grounds will help absorb unpleasant odors, leaving your refrigerator smelling fresh and clean. Dry oats One useful property of oats is their ability to absorb odors. To take advantage of this, you can place 1 cup of dry oats into a bowl or jar and position it inside your fridge. This will help mitigate and neutralize any unwanted smells. Activated charcoal Activated charcoal is a lesser-known but highly effective method for removing fridge odors. It can be used in handy pre-made sachets, which provide exceptional odor elimination results.  Moreover, activated charcoal is versatile and can be used to freshen up other areas such as shoes, cars, gym bags, closets, and drawers.  By incorporating activated charcoal into your odor-elimination routine, you can ensure a pleasant and fragrant environment throughout your home and belongings. Baking soda To maintain a fresh-smelling fridge, follow these steps: Citrus fruit To freshen your refrigerator, slice a lemon, orange, or grapefruit in half and place it in a bowl or on a plate for a few days. For a stronger citrus scent, sprinkle the fruit with salt.  This method can be used to deodorize bad smells, and you can either replace the citrus every few days or use it regularly. If you don’t want to waste the fruit, you can also utilize the citrus peel by sprinkling it with salt. Refrigerator Deodorizer This highly efficient device effortlessly eliminates odors within a matter of hours, ensuring your fridge or freezer remains completely odor-free for an impressive duration of 6 months.  What’s more, it is entirely food safe and fragrance-free, all while substantially prolonging the freshness and lifespan of your fruits and vegetables, increasing their longevity by 2-4 times.  By simply placing this convenient device inside your fridge or freezer, you can easily maintain an odorless environment effortlessly. Vanilla extract To infuse a delightful vanilla fragrance into your refrigerator, follow these simple steps: take a small bowl or ramekin and add a tablespoon or two of vanilla extract. Place the bowl or ramekin in the desired spot inside your fridge.  Allow the vanilla scent to permeate the refrigerator, creating a pleasant aromatic experience every time you open its doors. White vinegar To effectively control odors in the refrigerator, you can follow these steps: First, dampen a paper towel, washcloth, or cotton ball with vinegar. Next, place the vinegar-soaked material in a bowl and position it at the back of the refrigerator.  By implementing this straightforward solution, you can maintain a pleasant and fresh environment for your stored food items. The Best Refrigerator Odor Eliminator Here is a highly effective do-it-yourself (DIY) recipe that I have personally discovered for deodorizing and freshening the interior of your refrigerator. In a glass jar, combine the following ingredients:  8 ounces of baking soda, a quarter cup of natural sea salt, and 3 to 5 drops of your preferred essential oil, such as lemon, orange, or grapefruit.  Next, carefully place the uncovered jar at the back of your refrigerator. For continuous freshness, it is recommended to prepare a fresh mixture every one to two months.  By following this simple yet efficient method, you can ensure that your refrigerator remains odor-free and pleasantly scented. How Can You Keep Your Fridge Fresh? In addition to the aforementioned tips, there are several proactive measures that can be taken to effectively prevent the reoccurrence of unpleasant odors in the future. By following these additional recommendations, you can ensure a more hygienic and refreshing environment. Empty the Fridge Before you start cleaning your fridge, you need to empty it completely. Remove all the food items from the fridge and place them in a cooler or a basket. This process will help you remove any expired or spoiled food items that may have been hiding in the back of your fridge. Unplug the fridge if needed to avoid wasting energy. Clean the Fridge Once you have removed all the food, clean the fridge thoroughly. You can use a mixture of water and vinegar or a commercial cleaning agent to clean the fridge. Wipe down all surfaces, including the shelves, drawers, and walls of the fridge, using a soft cloth or sponge. Remember to clean the door gasket and vacuum the condenser coils of the fridge. Organize the Fridge After you have cleaned the fridge, organize it to ensure that you can find everything you need quickly. Separate your food items into categories such as drinks, dairy, raw meat, fruits, and vegetables, and place them in separate areas of the fridge to avoid cross-contamination. Label the containers and date the leftovers to ensure that you use them before they expire. Keep the Fridge Fresh To keep your fridge fresh, you need to maintain a consistent temperature of 40°F or below. Check the temperature settings of your fridge and adjust them accordingly. Keep an open box of baking soda in the fridge to absorb any odors or use an air purifier for

How To Keep Your Fridge Smelling Fresh Naturally? Read More »

Best Paint Colors For Kitchen Walls

8 Best Paint Colors For Kitchen Walls

When it comes to spending time in our kitchens, whether you’re an avid baker or someone who sticks to microwave meals, practicality is key. But kitchens are not just functional spaces; they often serve as gathering places for family and friends.  Therefore, choosing the right paint color for your kitchen walls is crucial in creating a warm and welcoming atmosphere that reflects your personality. So, what are the best paint colors for kitchen walls? To achieve a fresh and trendy look, draw inspiration from nature. Sky blues, spring greens, sage greens, and creams are popular choices for cooler and lighter shades. If you prefer warmer hues, consider buttery yellow or pinky terracotta. For a more dramatic and cozy feel, shades like navy, moss green, and chocolate brown can transform your kitchen into a sanctuary. Since a complete kitchen renovation occurs only about once a decade in my house, I like to keep the space inviting and up-to-date by simply changing the wall color. It’s incredible how a fresh coat of paint can instantly update tired walls and set the mood for the entire room. Now, let’s explore the trending paint choices for kitchens and discover the latest kitchen paint color options. 8 Best Colors To Paint Kitchen Walls Sky Blue Blue, being the most significant color trend for 2024, continues to be inspired by the natural world. It infuses tranquility into our homes, reminiscent of a summer sky or a peaceful forest lake. When it comes to kitchen colors, sky blue is an ideal choice. It not only portrays a sense of calm but also brings freshness reminiscent of a spring morning. This makes it perfect for a practical and busy space where your day begins and ends. Sky blue is a versatile color that works well in various kitchen styles, including English and French country-style, cottage-core, or vintage kitchens. You can pair it with white or gray cabinetry for an airy and light-filled room. For those seeking drama, navy blue or charcoal features can be combined with sky blue. Notably, sky blue is suitable for a family kitchen, providing comfort and energy for kids going off to school. It also creates a serene spa-like atmosphere for serious cooks who prioritize a composed mindset when tackling complex recipes. If you are considering using sky blue paint in your kitchen, you may want to explore the following stunning colors of the year: Incorporating sky blue into your kitchen design will undoubtedly bring a touch of serenity, clarity, and contentment. Dark Blue Dark and moody shades are becoming increasingly popular in kitchen interiors, replacing the traditional notion that painting a small room white is the best choice. This trend creates a cozy sanctuary in the kitchen, with darker shades like navy, indigo, and midnight blue imparting a dramatic and contemporary effect. For a truly immersive experience, consider applying a single inky shade to the entire room. Alternatively, you can create contrast by keeping the walls moody and opting for cabinetry in bold and contrasting colors. Consider bright navy and white for a vibrant look or go retro with a bottle green or orange. Here are a few options for bold kitchen colors: By embracing these bold color choices, you can transform your kitchen into a stylish and visually impactful space. Moss Green Green is an indispensable inclusion in any list of natural shades. This year’s paint colors embrace the abundant hues of leaves, stems, and flowers. Moreover, kitchens are blooming with the infusion of trendy green tones. If you have concerns that green might lend a juvenile appearance to your kitchen, put those worries aside. This season’s colors exude a sense of sophistication and offer more subdued variations. Think of mossy and moody greens reminiscent of ivy or French garden furniture. Like blue, green possesses a calming aura and is associated with positive attributes such as growth, health, and wellness. It serves as the perfect backdrop for any interior design, seamlessly blending with charming vintage, minimalist, or traditional aesthetics. Moss green can even be treated as a neutral shade, complementing it with white, natural wood, or striking marble slabs. To add a dash of modernity to your kitchen walls, consider selecting one of the designated colors of the year for 2024: If you prefer the timeless classics, the following options may suit your taste: Spring Green The kitchen offers an excellent opportunity to experiment with vibrant colors. Enhance the overall ambiance by painting the walls a refreshing shade of green. Opt for a fruity hue instead of overwhelming neon or chartreuse options. For a Scandi kitchen, consider pairing leafy green shades, such as apple or celery, with white and blue accents. In a more traditional kitchen, these shades can exude a sleek and sophisticated aura when combined with warm wood and brass accessories. Here are a few delectable shades of green that you might find appealing: Sage Sage is an incredibly soothing color choice for a kitchen, lighter than moss and slightly more subdued than spring green. This understated shade effortlessly combines vintage charm with the current eco-chic trend. Personally, I adore how sage pairs with the natural textures of wood, wicker, and pots of herbs. Additionally, it offers a whimsical charm when contrasted against bolder shades like cobalt, teal, or terracotta against the muted walls. Considering the wide range of sage shades available, I have carefully selected a few options for you: Terracotta When it comes to natural colors for your kitchen, it’s not always about the bright and vibrant options. Consider wrapping your kitchen in rich shades inspired by clay, soil, and stone, also known as earthy colors. One excellent option is terracotta, which has become a popular alternative to the traditional fire-engine red. This paint color offers a unique blend of energy from red and the softness of brown, creating a warm and inviting atmosphere ideal for family kitchens. Terracotta is commonly used for tiles and is particularly well-suited for Mediterranean and South-West interior styles, as well as

8 Best Paint Colors For Kitchen Walls Read More »

How To Organize Tupperware

How To Organize Tupperware? Easy Guide!

Properly organizing food storage containers, including Tupperware, can be a significant challenge in achieving efficient kitchen organization. These containers often occupy excessive space, resulting in frequent spills and lost pieces.  However, there is good news – there are effective strategies and techniques available to simplify and streamline the organization of Tupperware, making it a much more manageable task than you might expect. Why Tupperware is So Hard to Store? Tupperware containers are often a challenge to store efficiently, leaving many individuals with an unbalanced ratio of bottoms to tops. The difficulty arises from their space-consuming nature and the unfortunate tendency for pieces to become separated or misplaced.  This issue is further compounded when other members of the household are unsure how to handle these seemingly miscellaneous items during the cleaning and organizing process.  To alleviate these challenges, it is crucial to establish a well-defined organizational system that ensures effortless household cooperation and preserves the integrity of your Tupperware collection. How to Organize Tupperware – Easy Ideas for Storing Tupperware Store Your Lids Vertically To effectively store your lids in your cabinet, it is crucial to be mindful of their storage method. Lids often have a tendency to disappear and can quickly go missing. Therefore, instead of haphazardly tossing your lids, a recommended method is to store them vertically.  This allows for easy access to the desired lid without the risk of all the lids tumbling out and getting lost in the cabinet. Stack and Nest Your Containers Once you have separated your lids and containers, arrange them in a stacked formation to optimize space utilization and facilitate easy retrieval of desired items.  Tupperware containers, specifically bowls, can be nested inside one another, enabling efficient stacking and organized storage that prevents accidental spills or cabinet clutter. Sort Lids and Containers by Size When organizing and storing your Tupperware containers, it can be helpful to sort them by size. By placing larger containers at the bottom and smaller ones on top, you can effectively nest them together, optimizing storage space.  This not only reduces clutter but also makes it more convenient to locate the desired container and corresponding lid when needed. Consider Attaching Lids to Containers and Stacking This option is highly effective when you have a limited number of Tupperware pieces to store. For efficient space utilization, you can neatly stack the smaller ones inside the larger ones.  By doing so, you can optimize the storage capacity and ensure a clutter-free storage solution for your Tupperware collection. Use Your Kitchen Drawers Instead of the Cabinets An effective method for storing your Tupperware is to neatly stack the smaller pieces inside the larger ones and place them in a convenient drawer. By employing this technique, you eliminate the risk of items toppling over when you reach for what you need from the cabinet.  Consider keeping frequently used pieces in the drawer to enhance the efficiency of your daily routine. This approach simplifies your life and helps you maintain an organized kitchen. Split Your Lids and Containers Up To streamline the organization of numerous Tupperware containers, consider separating the lids and containers into designated spaces. Keep the lids in a designated drawer in your kitchen, ensuring they are easily accessible and less prone to misplacement.  Meanwhile, allocate the containers in your cabinets, optimizing storage based on their size and dimensions. This approach offers a systematic and efficient solution for managing your Tupperware collection. The Best Tools for Organizing Tupperware Drawer Dividers  One of the most challenging aspects of Tupperware organization is finding enough space to store all those containers and lids. That’s where drawer dividers come in! By using drawer dividers, you can create compartments for each container and lid, making it easy to keep them separated and organized within a single drawer. You can find drawer dividers in a variety of materials, including bamboo, plastic, and metal, so you can choose the one that best fits your needs and aesthetics. Pull-Out Shelves  If you don’t have enough space in your drawers for all your Tupperware, consider adding pull-out shelves to your cabinets. These shelves work just like a drawer, but can be installed in your existing cabinets. You can purchase pre-made pull-out shelves or customize them to fit your unique needs. By using pull-out shelves, you’ll be able to see all your Tupperware at once, making it easy to find the container or lid you need. Clear Containers  Another great tool for Tupperware organization is clear containers. Instead of storing each container and lid separately, you can use clear containers to group them together. For example, you can store all your containers in one clear container and all your lids in another. This will make it easy to keep track of everything and quickly find what you need. Plus, clear containers will provide a clean and cohesive look to your kitchen storage. Lid Holders  Tupperware lids can be particularly challenging to keep organized. That’s why lid holders are a great option! Lid holders can be attached to the inside of a cabinet or on the wall. They typically have slots of varying sizes to accommodate different lid sizes. By keeping your lids organized and easily accessible, you’ll never have to search for the right lid again. Lazy Susans  If you have a lot of Tupperware and lids, consider adding a lazy Susan to your cabinet or pantry. Lazy Susans are rotating trays that make it easy to access items in the back of a cabinet or pantry. By using a lazy Susan for your Tupperware, you’ll be able to quickly find and access everything you need. Plus, it’s a fun and creative way to add some functionality to your kitchen storage. Final Verdict I hope my tips will help you organize your Tupperware. You need to organize your Tupperware so that you will have a clean and organized kitchen.

How To Organize Tupperware? Easy Guide! Read More »

How To Eliminate Kitchen Odors

How To Eliminate Kitchen Odors?

The kitchen is undeniably one of the last places you would want to encounter unpleasant odors. Not only does it top the chart of odor-infested areas in a house, but it also harbors hidden bacteria and odor traps that can compromise the health of your family.  Maintaining cleanliness in the kitchen is crucial not just for the well-being of your loved ones but also for preserving a pleasant and sanitary environment that contributes to your peace of mind. 9 Simple Tips to Remove Odors from Your Kitchen Check the Trash Can To effectively address an offending odor in your kitchen, the first step is to check the trash can. If you are waiting for the trash bag to fill up before taking it out, consider disposing of your coffee grounds in the trash can instead of your garden or compost. This will help neutralize the odor. However, it is highly recommended that you take out the trash daily if you truly want to eliminate unpleasant smells in your kitchen. Additionally, when you change the trash bag, make sure to wash and dry the trash can thoroughly.  If the trash can is empty when the bag is removed, you may opt to use a disinfectant spray to quickly eliminate odor-causing bacteria. Another helpful tip is to add a few drops of tea tree essential oil to paper towels and place them at the bottom of your trash can. This will aid in deodorizing the garbage can and preventing foul smells. By following these suggestions, you can ensure a fresh and odor-free kitchen environment. Eliminate Kitchen Sink Odor By Cleaning the Garbage Disposal Regularly One effective method to eliminate kitchen sink odor is by ensuring regular cleanliness of the garbage disposal.  To clean the garbage disposal thoroughly, a simple approach is to introduce baking soda into it, followed by running warm water to rinse away any residual smell.  Another technique involves grinding up citrus rinds, such as oranges, lemons, or limes, and subsequently flushing them down the garbage disposal using warm water.  By implementing these steps, you can maintain a fresh and odor-free kitchen sink environment. Keep Your Refrigerator Clean Maintaining a clean and odor-free refrigerator is an important task to ensure the freshness and safety of your food. While it may not be the most enjoyable chore, neglecting this duty can result in unpleasant odors permeating throughout your kitchen. When cleaning your refrigerator, it is crucial to be mindful of the cleaning agents you use. Some cleaners may contain toxic chemicals that can pose a risk to your health if they come into contact with your food.  To avoid this, a recommended method is to clean your refrigerator using hydrogen peroxide, which effectively eliminates odor-causing bacteria without introducing harmful substances to your food. In addition to using peroxide, there are other steps you can take to maintain a clean refrigerator. One such method is to keep an open box of baking soda inside the refrigerator between cleanings. Baking soda acts as a natural deodorizer, absorbing any lingering odors and keeping your refrigerator smelling fresh. By incorporating these practices into your cleaning routine, you can ensure a hygienic and pleasant-smelling refrigerator that safeguards the quality and safety of your food. Keep the Space under Big Appliances Clean Under large appliances is a common area in the kitchen where odors tend to accumulate. When spills occur, they often find their way to places like under the refrigerator, stove, and dishwasher. If left unattended, these spills can foster the growth of odor-causing bacteria.  Therefore, it is recommended to periodically pull out your large appliances and clean underneath them to eliminate any unpleasant smells that may arise, especially during the warmer summer months. This proactive approach ensures a fresh and odor-free kitchen environment. Get Rid of Old Produce Proper storage of produce is crucial in preventing unpleasant odors, especially during the summer season. To maintain the freshness of your fruits and vegetables, it is recommended to regularly empty and clean food bins, like those for potatoes, onions, and other non-refrigerated items.  Additionally, if you notice a lingering odor in your kitchen despite its overall cleanliness, it may be necessary to thoroughly inspect the area. Removing all items from the counter and cleaning the surfaces beneath them can help eliminate any potential sources of odors.  Allow the counters to dry completely before returning the items. By following these steps, you can ensure that your kitchen remains odor-free and your produce stays fresh for longer durations. Keep the Space under the Sink and other Hidden Areas Clean Cleaning under the sink is a crucial task that should not be overlooked. Even a small leak can result in significant damage, mold growth, and the proliferation of harmful bacteria. Therefore, it is important to diligently inspect and clean this area to hunt down any hidden odors. Furthermore, once you have thoroughly cleaned all the places in your kitchen that may harbor unpleasant smells, you can employ basic deodorizing techniques to improve its overall scent. One effective method is to use vinegar or baking soda, which are known for their odor-reducing properties. By following these steps and implementing these additional measures, you can ensure a cleaner and more pleasant-smelling kitchen environment. Eliminate Cooking Smell To effectively mitigate common kitchen odors, it is important to take measures to control food smells while cooking. One useful technique is to place a bowl of vinegar on the stove when preparing high odor foods such as fish.  This simple yet effective method can significantly help in managing and minimizing the foul smell associated with cooking. Use an Air Purifier Air purifiers are an effective solution for eliminating unpleasant kitchen odors. These devices purify the air by removing impurities and odors, including pet smells, smoke, and kitchen odors. By doing so, air purifiers ensure that the air we breathe is clean and safe. When considering air purifiers, individuals have the option to choose between traditional models and more portable ones. Portable air purifiers are

How To Eliminate Kitchen Odors? Read More »

Scroll to Top