https://pagead2.googlesyndication.com/pagead/js/adsbygoogle.js?client=ca-pub-9463394879326171 crossorigin="anonymous">

Author name: Louis Dioso

Best Shoe Organizing Ideas

6 Best Shoe Organizing Ideas

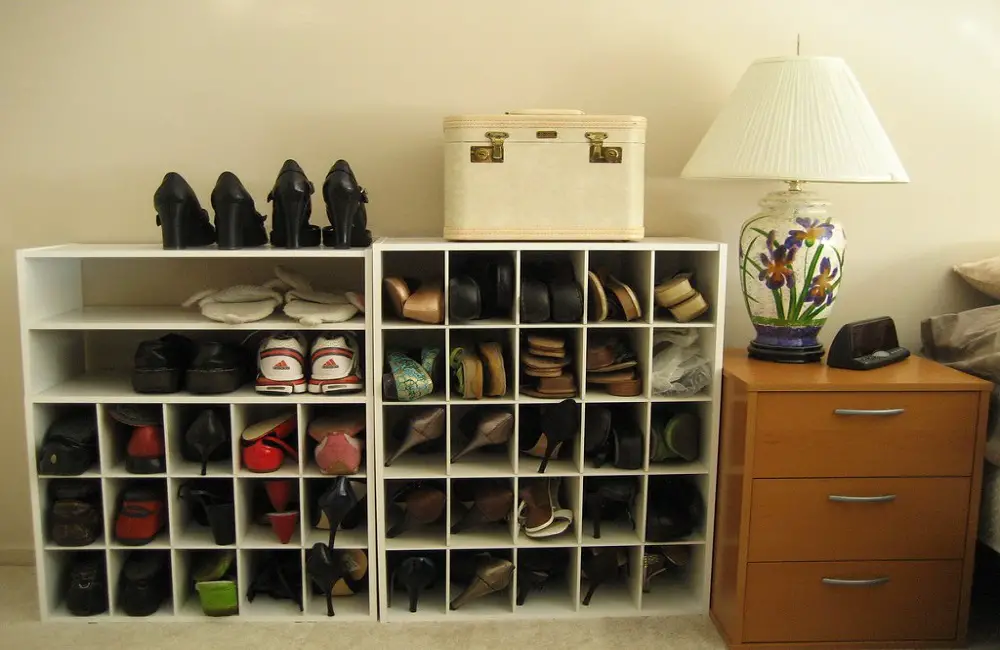
Having a well-organized collection of shoes is not only important for maintaining a tidy home but also for preserving the quality and longevity of your footwear. If you’re facing challenges due to limited space in your house, don’t worry, as there are practical solutions available.  In this article, I will provide you with comprehensive shoe organization ideas that will help you keep your shoes in good shape and easily accessible.  So, whether you’re looking to optimize your shoe storage or prevent your shoes from getting damaged, continue reading for valuable tips and techniques to efficiently organize your footwear collection. 6 Best Shoe Storage Ideas Entryway Shoe Storage Many households now promote the practice of removing shoes upon entering the house to prevent the spread of dust and dirt.  To aid in this effort, a stylish and space-saving shoe stand can be placed next to the entryway door. This stand not only adds aesthetic appeal but also provides a convenient storage solution for daily-use shoes, allowing for easy access before stepping out.  However, it is important to note that separate shoe organizers may be necessary for dress or fashion shoes. Large Bedroom Small Closet Storage Solution Many individuals often face the challenge of limited closet space. If you find yourself in possession of a sizable bedroom or spare room that lacks sufficient storage for your extensive shoe collection, it might be worth considering the addition of a shoe closet.  This specially designed closet boasts a generous capacity, capable of accommodating over 35 pairs of shoes. It proves to be a versatile solution that can cater to your needs or cater to the footwear needs of multiple family members who find themselves short on closet space.  With its compact design, spanning just under 35 inches in width, it can seamlessly integrate into a spacious walk-in closet or any sizable room with ample space.  This functional and stylish shoe closet not only provides the means to keep your shoes organized and easily accessible, but it also contributes to maintaining tidiness and reducing clutter within your walk-in closet or larger room. Use that Space Behind the Closet Door In some instances, you may find yourself facing a scarcity of storage space in the more conventional areas of your home. However, it is worth noting that both bedroom and closet doors are often overlooked as potential storage areas.  Fortunately, you can address your shoe organization predicament by opting for a behind-the-door pocket shoe holder, which not only solves the problem but also maximizes the utilization of the typically disregarded space in your bedroom. Under the Bed Shoe Organizer Ideas The space under the bed is a highly effective but frequently unused area for storage. By incorporating a few under-the-bed footwear storage solutions, you can efficiently organize your shoes and maximize the often-neglected space in your bedroom.  This convenient storage option is suitable for every member of the family, as it is available in every person’s room. Therefore, consider utilizing these storage boxes to optimize your storage capabilities and keep your footwear neatly organized. Turn Part of Your Clothes Rod into a Shoe Rack If you happen to have even a small amount of extra space on your Clothes rod or at the end of a shelf, you can utilize a shoe holder that is specifically designed with hooks, making it ideal for fitting over a clothing rod. This shoe storage container provides ample space for up to 10 pairs of shoes, and it also features 5 additional pockets on the side that are perfect for storing scarves, belts, or other small items. Therefore, not only does it serve as an effective space-saving solution, but it also enables you to neatly organize your shoe collection. Specialty Footwear organizers Not all types of footwear can be accommodated by standard shoe organizers. For instance, women’s boots or winter boots tend to be larger than the allocated space in shoe organizers. Therefore, it becomes necessary to have a boot stand specifically designed for those extra pairs of boots. Consider keeping one boot stand in a corner of your closet for fashion boots, and another one near the doorway for rain or winter boots. Furthermore, flip flops are another type of footwear that can be well-organized with their own dedicated organizer. The flip flop hanger is an excellent solution for organizing and storing your summer flip flops. This versatile hanger can be placed on the back of a door or hung on a clothes hanger in your closet, offering convenient storage options for your footwear collection. Conclusion Ensuring proper organization of your shoes is a straightforward process that revolves around selecting the appropriate shoe storage container to suit your specific organizational requirements.  By meticulously organizing your footwear collection, you can enhance accessibility, protect against damage, and optimize space utilization. Therefore, investing time and effort in finding the ideal shoe storage solution is crucial for maintaining a tidy and efficient space.

6 Best Shoe Organizing Ideas Read More »

How To Clean With Vinegar

How To Clean With Vinegar? Complete Guide!

When it comes to ensuring the health of your family and pets, using non-chemical cleaners to clean your home is undoubtedly the best choice. Among these alternatives, vinegar has gained a reputation as a versatile and effective household cleaner.  While recent studies have shed light on vinegar’s limitations as an all-round cleaner, it still holds significant value for various cleaning tasks in your home. In today’s discussion, we will explore the different ways you can effectively clean with vinegar. So, continue reading to discover insightful tips and techniques. Glass Cleaner Combining equal parts of white vinegar and warm water is a highly effective formula for window cleaning. When used correctly, this vinegar-based window cleaner will leave your glass surfaces bright, streak-free, and sparkling clean. To achieve optimal results, you can use either a squeegee or the black and white pages from a newspaper soaked in vinegar water to clean the windows. After cleaning, make sure to wipe the windows dry. Not only does this method leave your windows and mirrors sparkling clean, but it also ensures they are lint-free. If you’re seeking an alternative to Windex for cleaning your mirrors, using vinegar is a great option to consider. Mild Floor Cleaning It is generally not recommended to use vinegar as a regular wood floor cleaner. However, if you find the need for a mild cleaning solution, you can mix ½ cup of white vinegar with a gallon of hot water. When using this mixture, make sure to wring out the mop as much as possible to avoid excessive moisture on the wood floor.  Damp mopping with vinegar solution provides a light cleaning while also disinfecting the surface. This can be particularly beneficial if you have small children who are still in the crawling stages and require a clean and safe environment. Clothing Deodorizer and Fabric Softener If you have a child who frequently forgets to empty their gym bag, or if you’re an adult with a regular workout routine, you’re likely familiar with the persistent, unpleasant odor that clings to gym clothes. Standard laundry soap alone often fails to completely eliminate this funky smell. Fortunately, there’s a simple and effective solution: using baking soda and vinegar.  To deodorize and remove any mildew scent from clothing, add ¼ cup of baking soda to your laundry detergent during the wash cycle. Then, during the rinse, incorporate ½ a cup of vinegar. By following this method, you’ll achieve not only clean and fresh-smelling clothes but also softer garments. Calcium Remover Vinegar is exceptionally effective for removing calcium deposits. It can be used on its own or mixed with hot water, depending on the severity of the build-up, to eliminate calcium build-up from clothes and dishwashers. When it comes to descaling a tea kettle, a mixture of equal parts vinegar and water can be used. Simply let the kettle boil after adding the mixture. Afterward, it is imperative to rinse the kettle thoroughly with fresh water to eliminate any lingering vinegar taste. Moreover, to address lingering calcium build-up in a coffee pot, pour undiluted vinegar into the reservoir. Run a cycle of vinegar-laden coffee and follow up with at least two reservoirs of clean water to ensure the complete removal of any residual vinegar. Mold and Mildew Prevention Mold and mildew are common issues in damp areas, particularly in bathrooms and kitchens. To effectively prevent the growth of mold and mildew spores, you can create a solution by combining 1 part hydrogen peroxide and 1 part vinegar.  Transfer the solution into a spray bottle and use it to clean these areas on a weekly basis. This routine maintenance will help keep your home free from the harmful effects of mold and mildew, ensuring a healthier living environment for you and your family. All Purpose Disinfectant Vinegar, although not an optimal home cleaner, serves as an effective disinfectant. A simple yet powerful solution can be made by mixing 1 cup of distilled water, 1 cup of white vinegar, and 15 drops of essential oils.  This versatile disinfectant can be applied on various surfaces in your kitchen and bathroom, ensuring the cleanliness and hygiene of your countertops, toilet, sink, and tub.  While the essential oils add a pleasant scent to the disinfectant, it’s important to note that you can achieve effective disinfection without them. Air Freshener Vinegar, surprisingly, can serve as an effective air freshener to eliminate a wide range of unpleasant odors from the surrounding atmosphere. To create your homemade air freshener, simply combine equal parts (½ cup) of vinegar and water in a misting bottle.  Utilize this solution to invigorate and freshen the air in any room within your humble abode. The remarkable versatility of vinegar makes it an excellent choice for maintaining a pleasant and welcoming indoor environment. What Not to Clean with Vinegar Vinegar is a versatile cleaning agent with a wide range of applications. However, it is crucial to note that there are specific items that should never be cleaned with vinegar. To ensure proper maintenance and avoid damage, it is important to be aware of these items. Some examples of items that should not be cleaned with vinegar include: Natural Stone Surfaces It is strongly advised to avoid cleaning natural stone surfaces, such as granite or marble countertops, using vinegar or any other cleaning solution with acidic properties. The acid in vinegar has the potential to cause significant damage to these valuable and costly items, making it imperative to handle them with utmost care.  It is recommended to utilize specialized cleaning products explicitly designed for the maintenance and preservation of natural stone surfaces. By doing so, you can ensure their longevity and retain their aesthetic appeal for years to come. Grout Vinegar can potentially damage your grout due to its acidic properties. The acid in vinegar corrodes the grout, leading to the dissolution of the top layers of grout molecules, thereby causing tile loosening. It is important to be cautious when using vinegar on grout surfaces to ensure their

How To Clean With Vinegar? Complete Guide! Read More »

How To Eliminate Kitchen Odors

How To Eliminate Kitchen Odors?

The kitchen is undeniably one of the last places you would want to encounter unpleasant odors. Not only does it top the chart of odor-infested areas in a house, but it also harbors hidden bacteria and odor traps that can compromise the health of your family.  Maintaining cleanliness in the kitchen is crucial not just for the well-being of your loved ones but also for preserving a pleasant and sanitary environment that contributes to your peace of mind. 9 Simple Tips to Remove Odors from Your Kitchen Check the Trash Can To effectively address an offending odor in your kitchen, the first step is to check the trash can. If you are waiting for the trash bag to fill up before taking it out, consider disposing of your coffee grounds in the trash can instead of your garden or compost. This will help neutralize the odor. However, it is highly recommended that you take out the trash daily if you truly want to eliminate unpleasant smells in your kitchen. Additionally, when you change the trash bag, make sure to wash and dry the trash can thoroughly.  If the trash can is empty when the bag is removed, you may opt to use a disinfectant spray to quickly eliminate odor-causing bacteria. Another helpful tip is to add a few drops of tea tree essential oil to paper towels and place them at the bottom of your trash can. This will aid in deodorizing the garbage can and preventing foul smells. By following these suggestions, you can ensure a fresh and odor-free kitchen environment. Eliminate Kitchen Sink Odor By Cleaning the Garbage Disposal Regularly One effective method to eliminate kitchen sink odor is by ensuring regular cleanliness of the garbage disposal.  To clean the garbage disposal thoroughly, a simple approach is to introduce baking soda into it, followed by running warm water to rinse away any residual smell.  Another technique involves grinding up citrus rinds, such as oranges, lemons, or limes, and subsequently flushing them down the garbage disposal using warm water.  By implementing these steps, you can maintain a fresh and odor-free kitchen sink environment. Keep Your Refrigerator Clean Maintaining a clean and odor-free refrigerator is an important task to ensure the freshness and safety of your food. While it may not be the most enjoyable chore, neglecting this duty can result in unpleasant odors permeating throughout your kitchen. When cleaning your refrigerator, it is crucial to be mindful of the cleaning agents you use. Some cleaners may contain toxic chemicals that can pose a risk to your health if they come into contact with your food.  To avoid this, a recommended method is to clean your refrigerator using hydrogen peroxide, which effectively eliminates odor-causing bacteria without introducing harmful substances to your food. In addition to using peroxide, there are other steps you can take to maintain a clean refrigerator. One such method is to keep an open box of baking soda inside the refrigerator between cleanings. Baking soda acts as a natural deodorizer, absorbing any lingering odors and keeping your refrigerator smelling fresh. By incorporating these practices into your cleaning routine, you can ensure a hygienic and pleasant-smelling refrigerator that safeguards the quality and safety of your food. Keep the Space under Big Appliances Clean Under large appliances is a common area in the kitchen where odors tend to accumulate. When spills occur, they often find their way to places like under the refrigerator, stove, and dishwasher. If left unattended, these spills can foster the growth of odor-causing bacteria.  Therefore, it is recommended to periodically pull out your large appliances and clean underneath them to eliminate any unpleasant smells that may arise, especially during the warmer summer months. This proactive approach ensures a fresh and odor-free kitchen environment. Get Rid of Old Produce Proper storage of produce is crucial in preventing unpleasant odors, especially during the summer season. To maintain the freshness of your fruits and vegetables, it is recommended to regularly empty and clean food bins, like those for potatoes, onions, and other non-refrigerated items.  Additionally, if you notice a lingering odor in your kitchen despite its overall cleanliness, it may be necessary to thoroughly inspect the area. Removing all items from the counter and cleaning the surfaces beneath them can help eliminate any potential sources of odors.  Allow the counters to dry completely before returning the items. By following these steps, you can ensure that your kitchen remains odor-free and your produce stays fresh for longer durations. Keep the Space under the Sink and other Hidden Areas Clean Cleaning under the sink is a crucial task that should not be overlooked. Even a small leak can result in significant damage, mold growth, and the proliferation of harmful bacteria. Therefore, it is important to diligently inspect and clean this area to hunt down any hidden odors. Furthermore, once you have thoroughly cleaned all the places in your kitchen that may harbor unpleasant smells, you can employ basic deodorizing techniques to improve its overall scent. One effective method is to use vinegar or baking soda, which are known for their odor-reducing properties. By following these steps and implementing these additional measures, you can ensure a cleaner and more pleasant-smelling kitchen environment. Eliminate Cooking Smell To effectively mitigate common kitchen odors, it is important to take measures to control food smells while cooking. One useful technique is to place a bowl of vinegar on the stove when preparing high odor foods such as fish.  This simple yet effective method can significantly help in managing and minimizing the foul smell associated with cooking. Use an Air Purifier Air purifiers are an effective solution for eliminating unpleasant kitchen odors. These devices purify the air by removing impurities and odors, including pet smells, smoke, and kitchen odors. By doing so, air purifiers ensure that the air we breathe is clean and safe. When considering air purifiers, individuals have the option to choose between traditional models and more portable ones. Portable air purifiers are

How To Eliminate Kitchen Odors? Read More »

How To Remove Stains From Carpet

How To Remove Stains From Carpet?

Accidents can happen no matter how well you care for your home, and some of these incidents can lead to unsightly stains on your carpeting. Even if the rest of your home is spotless, stained carpeting can create an unfavorable impression when guests visit. To address this issue, here are some valuable tips on how to effectively remove carpet stains in between professional cleaning sessions. It is crucial to note that vigorously scrubbing at a stain or spill can actually worsen the situation by driving the stain deeper into the carpet and the underlying pad, rendering it nearly impossible to remove.  Therefore, it is best to proceed with caution and follow these guidelines for optimal stain removal results. Best Way to Remove Stains from Carpet To effectively remove stains from your carpeting, it is crucial to prevent the stains from setting in the first place. Promptly attending to spills or stains can often allow for easy removal using clear water and clean rags. For liquid stains, start by placing a clean, light-colored rag or paper towel over the spill to blot up as much of the stain as possible. Continuously change rags or towels until no further stain is absorbed. Next, dampen the area with clear water and continue blotting with a rag or towel. Repeat this process until the towel or rag comes up completely clean. To expedite drying, utilize a hairdryer. In some cases, you may not notice the stain until after it has set into the carpeting. However, there are still effective ways to remove such set and stubborn stains. Take a look at the following guide for a comprehensive overview of how to remove different types of set-in stains. How to Remove Old Stains from Carpet? Cleaning Blood, Chocolate, Coffee, Tea, Mustard, Vomit, Urine and Wine Stains To effectively remove various stains from your carpet, including blood, chocolate, coffee, tea, mustard, vomit, and wine stains, ammonia proves to be a cost-effective solution. Follow these steps for optimal results: By following these structured guidelines, you can effectively utilize ammonia to tackle a wide range of carpet stains, ensuring a clean and pristine appearance. Removing Fat, Oil or Wax from Your Carpeting Occasionally, you may encounter stains on your carpeting caused by tracked-in oil, dripping candles, or even dropped food resulting in stubborn stains that can be quite challenging to remove. Fortunately, there is a simple and effective method you can employ using common household items. To tackle these stains, you will need a paper towel or a clean light-colored cloth and an iron. Begin by placing the paper towel or cloth directly over the stain. Next, set your steam iron to a warm temperature and carefully place it over the towel, applying gentle pressure. After a few seconds, lift the iron and subsequently remove the towel. You should notice that the stain has transferred onto the paper towel or cloth. If some remnants of the stain still persist, repeat the process with a fresh towel or cloth until the entire stain is successfully eliminated. By following these steps, you can effectively address various types of stains on your carpet with ease and restore its pristine condition. Removing Gum from Your Carpet Removing gum from carpet can be a challenging task, and it requires specific steps to achieve success. To begin, gather a sufficient amount of ice and place it directly on the gum. Allow the gum to freeze completely. Once frozen, use a blunt object, such as a spoon, to break the gum into smaller pieces.  Take caution as you remove the broken gum from the carpet, ensuring not to embed it back into the fibers. To thoroughly rid your carpet of the gum, use the hose attachment of your vacuum cleaner. This will prevent the possibility of accidentally rolling over any small gum pieces and reattaching them to the carpet. Removing Ink Stains Ink stains on your carpet can be a real eyesore. Fortunately, there are several effective methods to remove these stubborn ink stains without causing any damage to your carpet. Firstly, if your carpet is made from polyester, you can try using lacquered hair spray along with clean light cloths to tackle the stain. Simply spray the hair spray generously on the affected area and use a clean cloth to blot the stain until it disappears. Repeat this process as needed until the stain is completely gone. However, be aware that lacquered hair spray may not work on all types of carpet fibers. If your carpet is made from materials other than polyester, you can try a mixture of equal parts cornstarch and milk.  Create a paste using these ingredients and apply it to the ink stain. Allow the paste to dry completely, and then vacuum it up. If there is any remaining residue, you can dampen a cloth with a solution of 1 cup of water and 1 tablespoon of white vinegar to blot the rest of the stain. Finally, rinse the area with clear water. By following these methods, you can effectively eliminate those pesky ink stains and restore the pristine look of your carpet. How to Get Rid of Nail Polish Stain To effectively remove nail polish from carpeting, it is recommended to use nail polish remover. However, it is important to be mindful of the amount used, as excessive application may impact the color of your carpet. It is advised to apply a minimal amount of nail polish remover and gently blot the affected area using a clean cloth or sponge. This will help prevent any unwanted discoloration or damage to the carpet fibers. Removing Milk Stains Milk stains on the carpet can not only be visually unattractive but can also emit unpleasant odors. However, there is an effective way to remove these stains. To start, combine 1 tablespoon of dish soap with 2 cups of lukewarm water.  Once the mixture is ready, take a clean light-colored cloth or sponge and moisten it with the soapy solution. Gently blot

How To Remove Stains From Carpet? Read More »

How To Clean Hardwood Floors With Vinegar?

How To Clean Hardwood Floors With Vinegar?

Hardwood floors are known for their ability to create a warm and natural ambiance in your home. However, if not properly maintained, they can quickly lose their shine and become stained. Cleaning hardwood floors can be a daunting task, and without the appropriate cleaning solutions, it can also be expensive. Luckily, there is a safe and affordable alternative to traditional cleaning products – vinegar. Vinegar is not only an excellent cleaning solution but also a natural one that is safe for you, your family, and even your pets.  In this comprehensive blog post, we will guide you through the process of cleaning hardwood floors with vinegar, helping you maintain their shiny and pristine appearance for years to come. So, let’s dive in and discover the wonders of using vinegar to clean and revive your hardwood floors. Why Use Vinegar for Cleaning Hardwood floors? Safe and non-toxic Vinegar is a natural and non-toxic agent that is safe to use on all kinds of surfaces, including hardwood floors. Unlike chemical cleaners, vinegar does not produce fumes or harmful toxins that can cause respiratory problems, allergies, or skin irritations. Vinegar is eco-friendly and does not harm the environment, making it a great choice for cleaning your hardwood floors. Cost-effective Vinegar is an inexpensive cleaning agent that can be found in every household. Instead of spending a lot of money on expensive commercial cleaning products, you can use vinegar to clean your hardwood floors. It works as well as any other cleaning solution, but without the added cost. Effective in removing stubborn stains Hardwood floors are prone to staining, and it can be challenging to remove them. Vinegar is an excellent solution for removing stubborn stains from hardwood floors. White vinegar can dissolve dirt and grime, and it is effective in breaking down stains on the floor. You can mix vinegar with water in a spray bottle and use it to clean your hardwood floors. Helps preserve the finish Using vinegar to clean hardwood floors can help preserve the finish of the floor. Vinegar is gentler than other chemical cleaners, and it does not strip the natural oils from the wood. When used in moderation and diluted appropriately, vinegar does not harm the finish of the hardwood floors and leaves them looking shiny and polished. Easy to use Using vinegar to clean hardwood floors is straightforward and requires no special equipment. All you need is a spray bottle, white vinegar, and water. Mix ½ cup of vinegar with a gallon of water in a spray bottle and shake well. Spray the solution on the hardwood floor and mop it with a microfiber mop. The vinegar solution will evaporate quickly, leaving a clean, shiny surface. The Correct Way to Clean Hardwood Floors with Vinegar To ensure that you clean your wood floor with vinegar without causing any damage, it is important to follow the correct cleaning process. Begin by sweeping or vacuuming the floor using a soft brush attachment to prevent scratching. Alternatively, you can use a broom with soft tips for this purpose. Once the initial cleaning is complete, proceed to create a cleaning solution using vinegar and water. In a bucket, mix ½ cup of white vinegar with a gallon of warm water, ensuring that the two are well blended. Now, it’s time to move on to the actual cleaning process. Dip a mop or a cloth into the vinegar and water solution, making sure to wring out any excess liquid. Gently mop or wipe the wood floor, paying attention to any stubborn stains or dirt patches. After you have finished cleaning, allow the floor to air dry. Avoid walking on the wet surface to prevent any potential slips or accidents. By following these steps and using the correct cleaning techniques, you can effectively clean and maintain your wood floor using vinegar, while keeping it in excellent condition for years to come. Different Ways to Mop Your Hardwood Floor Traditional Mop and Bucket The traditional mop and bucket remains the most common method for mopping hardwood floors. Using a mop and bucket is a straightforward process – just fill a bucket with water and a cleaning solution of your choice, then dip the mop mop in the solution and wring out any excess water before you get started. Then simply go over your hardwood floor completing the soiled area. Sponge Mops Sponge mops are popular for their convenience and affordability. They are easy to use and readily available at most stores. Sponge mops are ideal for smaller messes and spills. However, if you want a deep clean, the sponge mop may not be the best option, as it tends to push the dirt around rather than picking it up. Spray Mops A spray mop is a fantastic option if you want to clean your hardwood floor quickly and easily. They are perfect for light cleaning and maintenance. The spray function allows you to control how much water and cleaning solution you use, ensuring that your hardwood floors don’t get soaked in the process. Steam Mops Steam mops have become increasingly popular in recent years because they are effective at cleaning hardwood floors without leaving any residue. They use hot steam to disinfect and remove dirt and bacteria from the floor. They don’t require any chemicals, making them a great eco-friendly option. Robot Mops If you want to take advantage of the latest technology, you can try using a robot mop. These machines save you time and effort by gliding across your hardwood floors to pick up dirt and debris. However, they can be quite expensive, making them an option for those who can afford one. Is It Safe to Use Vinegar to Clean Hardwood Floors? It is important to acknowledge that there is a range of opinions concerning the use of vinegar as a cleaning agent for wooden floors. This stems from the fact that most wooden floors are coated with a finish, and the acidic properties of vinegar may accelerate the

How To Clean Hardwood Floors With Vinegar? Read More »

How To Organize Your Medicine Cabinet

How To Organize Your Medicine Cabinet?

Your medicine cabinet is an important part of your home. It’s where you keep all the medications, vitamins, and first-aid supplies that you need to stay healthy. But if your medicine cabinet is unorganized, it can be difficult to find what you need when you need it.  Not only that, an unorganized medicine cabinet can be hazardous, leading to confusion about which medication to take and even accidental overdoses.  That’s why it’s important to take the time to organize your medicine cabinet properly. In this post, we’ll discuss nine ways you can do just that, creating a healthier and safer home. Empty and Clean Out Your Medicine Cabinet To efficiently organize your medicine cabinet, start by emptying it completely and thoroughly cleaning it. As you clean out your cabinet, carefully set aside any prescription medications that have expired so that you can dispose of them in a proper and responsible manner.  By following these steps, you can ensure a well-organized and safe medicine cabinet. Sort Your Items into Categories Please organize the remaining objects in your medicine cabinet by their respective categories. Separate first aid products into one group, makeup products into another, and over-the-counter medications for adults and children into separate piles as well.  Additionally, ensure that prescription medications are sorted according to each individual for whom the medication is prescribed. Dispose of that Outdated Medication Safely Once you have neatly sorted everything into separate piles, it is important to ensure the safe disposal of any outdated medication. For proper disposal, it is recommended to place the medication in a plastic bag along with either kitty litter or coffee grounds.  Mix the medication thoroughly within the bag, then discard it in your regular garbage can or bin designated for waste disposal. By following these steps, you can ensure the responsible and safe disposal of expired medication. Use a Separate Container for Each Category To ensure proper organization and tidiness, it is advisable to use separate containers for each category of products that will be placed in the medicine cabinet. In case the medicine cabinet is lacking space, a convenient alternative would be to store first aid products in a sealed container and position it on a dedicated shelf in your bathroom. This method will help maximize storage capacity while maintaining accessibility to essential items. A comprehensive first aid kit should include the following essential items: Having a well-organized and properly stocked first aid kit is crucial for addressing common injuries and emergencies effectively. Adjust the Shelves To optimize storage space, consider adjusting the shelves in your adjustable shelving unit to accommodate larger items. This includes items like mouthwash and other tall bottles or containers.  It is advisable to minimize the number of these larger bottles and containers to free up more space for other necessary items. By doing so, you can effectively organize your shelving unit and make the most of the available storage capacity. Place Each Container in the Cabinet To ensure organization, return the neatly sorted items to the medicine cabinet. Arrange the items based on frequency of use, with daily-use items easily accessible and infrequently-used items stored on the upper shelf. Make Use of that Medicine Cabinet Door One effective way to maximize the utility of your medicine cabinet door is by implementing a few practical strategies. Firstly, consider utilizing stick-on pods, readily available for purchase, which can be affixed to the door surface, providing additional storage space for containers and small items.  Moreover, by attaching magnetic strips to the door, you can conveniently secure various essentials such as nail files, tweezers, and other commonly used items.  These simple yet effective solutions enhance organization and accessibility within your medicine cabinet, optimizing its functionality. What You Shouldn’t be Putting in Your Medicine Cabinet Many individuals tend to use their medicine cabinet as a general storage place for various items they are uncertain about where to put. Nonetheless, it is important to note that certain items, such as shampoos, body wash, cream rinse, body lotions, and bar soaps, should not be stored in the medicine cabinet. There are alternate locations within your bathroom where you can store these objects.  By doing so, you will save space in your medicine cabinets, ensuring that they are out of reach for young children and discreet from prying eyes. Organizing your medicine cabinet does not require a significant amount of time. It simply involves periodically checking your medications and safely disposing of any expired ones. Taking these steps will not only help maintain an orderly medicine cabinet but also ensure the safety and accessibility of your personal care items. Seek Expert Advice When in doubt, seek expert advice. This could be from a pharmacist or your healthcare provider. They can help you determine what medications you need and how best to store them. Final Words By following these nine tips, you can organize your medicine cabinet so it’s a safer and more effective space. Not only will you be able to find what you need quickly, but you’ll also be able to reduce the risk of confusion and accidental overdose. Remember, a well-organized medicine cabinet is an important part of a healthy lifestyle.

How To Organize Your Medicine Cabinet? Read More »

11 Easy And Fast Ways To Prepare Your Home For Guests

11 Easy And Fast Ways To Prepare Your Home For Guests

Ding dong! It’s your guests at your doorstep – and you realize you’ve got an untidy home. You may feel overwhelmingly pressured, but don’t let it dampen the excitement of spending time with your loved ones.  Prepare your abode beforehand without causing any stress using these stress-free tips that won’t take too much of your time or energy. 11 Stress-Free Ways To Prepare Your Home For Guests Clean Your Entryway It is highly advisable to allocate your cleaning efforts to the entryway and porch. This particular area serves as the initial point of contact for your guests upon arrival, presenting a valuable opportunity to create a welcoming ambiance.  To ensure a positive impression, devote attention to tidying and decluttering this space. By doing so, not only will you make your guests feel at home, but also provide them with a warm and spacious reception. Do a Quick Cleanup Just before your guests are expected, take a moment to do a brief walkthrough of your house (approximately 15-30 minutes). During this time, ensure that any laundry, shoes, toys, or other items that may be cluttering the floor are tidied up.  Additionally, swiftly run the vacuum over your floors to create an appearance of cleanliness and readiness for your arriving guests. Ask Ahead  To ensure a smooth and comfortable experience for your guests, it is recommended to inquire about any specific dietary restrictions, allergies, favorite foods, or daily routines they may have.  Gathering this information prior to their arrival allows you to prepare in advance and have necessary items readily available. Taking these steps not only demonstrates your attentiveness but also conveys a sense of genuine care and consideration. Prepare a Basket of Easy Breakfast Items One of our favorite ways to create a welcoming atmosphere for guests in our home is by setting up a breakfast bar. It’s often challenging to prepare three meals a day while entertaining, so having a quick and convenient breakfast option is a thoughtful touch.  For the breakfast bar, we recommend placing a basket on your kitchen table, island, or counter and filling it with a variety of items. To ensure a satisfying breakfast experience, consider including fresh fruit, homemade oatmeal bars, packaged pastries, cereal, protein bars, and, of course, coffee! Having these options readily available will make it easier for your guests to fuel up and start their day off right. Make the Bed To ensure a warm and inviting atmosphere for your guests, take a few minutes before their arrival to place clean linens on the bed and fluff the pillows. These small touches will make them feel exceptionally welcomed. Additionally, adding extra pillows and blankets will contribute to creating a delightful and cozy environment. Consider going the extra mile by equipping the guest room with essential amenities such as an alarm clock, tissues, and a trash can. These thoughtful additions will enhance their comfort and convenience during their stay. Clear a Shelf or a Countertop In order to ensure a comfortable stay for your guests, it is recommended that you clear a single shelf, table, or countertop in the room they will be staying in. This will provide a designated area for them to store their suitcases and personal belongings during their visit.  Additionally, if time permits, it is advisable to clear some closet space as well. By doing so, you can further enhance their experience and provide ample room for their belongings. Set Out Clean Towels and Washcloths To ensure a comfortable stay for your guests, it is important to provide clear instructions on where to find fresh towels and washcloths.  A thoughtful gesture would be to place them either on the bathroom counter or at the end of their bed. By doing so, you will make them feel truly welcomed and well-taken care of during their visit. Light Some Candles When preparing to show a home, real estate agents often recommend baking cookies. The reason behind this suggestion is the power of pleasant smells in creating a welcoming atmosphere.  You can further enhance the ambiance by lighting soy wax candles, wax melts, or using essential oils about an hour before your guests arrive.  By doing so, you can create a great-smelling house that feels fresh and inviting, ensuring a positive first impression for potential buyers or visitors. Light Up the Fireplace During the fall and winter months, the comforting and inviting warmth of a crackling fire adds a soothing ambiance to your home. It not only keeps the house cozy and snug but also provides an ideal gathering spot for guests once they arrive and get settled in.  Additionally, the mesmerizing glow and gentle crackling of the fire create a tranquil atmosphere that enhances relaxation and fosters meaningful conversations. Play Some Background Music To create a pleasant and relaxed atmosphere, consider playing some background music. During the holiday season, Christmas music can add a festive touch for guests staying over. If it’s not a holiday, opt for soothing tunes set at a low volume, ensuring it provides a subtle background ambiance for perfect relaxation. Clean Your Kitchen The kitchen is the heart of the home, and it’s also where your guests are likely to spend the most time. Make sure your kitchen is clean and tidy before your guests arrive. Wipe down your countertops, sweep the floors, and empty the dishwasher. If you don’t have time for a deep clean, at least make sure that everything is in its place. Final Thoughts Prepping your home for guests can seem stressful, but with these simple tips, you can get your home ready with plenty of time to spare, allowing you to connect with your guests and enjoy quality time together. Remember to keep it easy and efficient, and who knows, they might stay longer!

11 Easy And Fast Ways To Prepare Your Home For Guests Read More »

What Color Bed Sheets Should I Get

What Color Bed Sheets Should I Get?

When it comes to decorating your bedroom, the process can often feel daunting. However, it’s important that the room not only reflects your personality but also aligns with the overall style of your home. Creating a space that exudes chicness and individuality starts with the bed, which serves as the focal point and the essence of the room. To create the bed of your dreams, you should begin by carefully selecting a frame, mattress, and sheets. Since the sheets are the first thing that catches the eye, they play a crucial role in showcasing your personality. When choosing the design and color of your bedsheets, there are several factors to consider. These include the style of the room, how well they complement the bed frame, and, most importantly, your personal preferences.  It’s worth mentioning that finding the perfect set of bedsheets may require some effort, and you might even consider having multiple sets for different seasons. We’ve thoughtfully outlined the key aspects you should keep in mind while browsing, ensuring that your shopping experience becomes enjoyable rather than stressful. Why Does Style Matters? When choosing sheets for your bedroom, it’s important to consider the overall decor style of the room. For a country cottage home, blue or red gingham sheets can be the perfect complement. In classic bedrooms, solid colored, cotton sheets tend to look best.  However, if you have a contemporary design, you have more freedom to experiment with color and texture. Consider using silky gray sheets to create a modern and stylish atmosphere. If your home has a rustic theme, you can incorporate nature-inspired elements into your sheet choices. For example, woven cream blankets or sage-green cotton sheets would look right at home in a rustic setting. When selecting sheets, it is crucial to consider both the visual appeal and the overall aesthetic of the room. By carefully choosing the right sheets, you can create a cohesive and harmonious look that complements your chosen decor style. Complementing Your Bed Frame When it comes to creating a harmonious look for your bed, bed sheets play a crucial role alongside the bed frame. Matching the sheets with the bed frame is essential for achieving a pleasing aesthetic. While there are no strict guidelines to follow, it is worth considering that dark-colored wood pairs well with lighter colors, offering an appealing contrast. For light wood frames, jewel tones serve as a compliment, while bold colors create a striking contrast against metal frames.  Feel free to experiment until you find the perfect combination that pleases you the most. Making it Personal Different patterns offer unique ways to incorporate your personality into bed sheet design. Stripes, for instance, are a timeless choice that adds a touch of sophistication. On the other hand, animal prints can showcase a bold and contemporary style.  If you prefer a more delicate aesthetic, a subtle floral pattern might be ideal, while larger flowers can make a bolder statement. Ultimately, the key is to choose a pattern that resonates with you. Remember to also consider the overall room design when making your selection. By taking these factors into account, you can ensure that your bed sheets reflect your personal style and create a harmonious atmosphere in your bedroom. Seasonal Considerations If you live in a region that experiences both summer and winter, it’s advisable to have at least two sets of sheets for seasonal changes. During warm weather, opt for light cotton blends. To add a touch of seasonal design, consider floral patterns and shades of green that embody the themes of renewal associated with spring and summer. On the other hand, autumn and winter nights can be harshly cold, and it’s a good idea to add a duvet to your bed. Duvet covers offer a variety of colors to choose from, allowing you to switch them up throughout the seasons.  Additionally, thick flannel or wool throws can provide extra warmth during this time of year. For a hint of holiday cheer, you can also consider red sheets to evoke autumn leaves and festive celebrations, or a warm brown color that brings to mind images of the harvest. By making these thoughtful choices, you can ensure comfort and style throughout the year. Color Theory When faced with indecision regarding the choice of bed sheets, it can be helpful to consider the principles of color theory. This theory not only provides insights into the most complementary color combinations but also explains the impact that different shades can have on an individual’s mood and emotions.  By taking color theory into account, one can make more informed decisions and create harmonious living spaces tailored to personal preferences and desired atmospheres. Complementary Colors The color wheel serves as a helpful visual aid to determine the optimal color combinations. When selecting colors for your sheet set to create visual interest, keep these color combinations in mind: It’s important to consider the hue as well. Mixing jewel tones and pastels can either create a successful color palette or disrupt the overall harmony. Complementary colors offer an excellent starting point for your exploration. Feel free to experiment and find the color combination that best suits your preferences and style. Color Symbols and Moods Color symbolism can be utilized to provide guidance on the selection of sheets. Consider incorporating colors that align with your desired ambiance or convey specific meanings. By integrating these symbolic colors, you can enhance the overall aesthetic and mood of your space. Red is a bold and powerful color that is often associated with passion and anger. Due to its agitating nature, it is recommended to use red as an accent color, rather than the main color, in the bedroom. Yellow is believed to inspire creativity and is associated with happiness and optimism. It can be a nice choice for bedding and can add a cheerful touch to the bedroom decor. Green is a popular color in design due to its association with nature. It is also versatile, as it can be

What Color Bed Sheets Should I Get? Read More »

How To Choose The Right Bed Frame

How To Choose The Right Bed Frame? Complete Guide!

Your bed frame is more than just a place to lay your head at night; it’s the foundation of your sleep sanctuary. A bed frame can set the tone for your entire bedroom and ultimately impact the quality of your sleep.  With so many styles, sizes, and materials to choose from, it’s easy to feel overwhelmed. But don’t worry, we’ve got you covered! In this blog post, we’ll explore several factors to consider when choosing the right bed frame for your needs. How To Choose The Right Bed Frame? 5 Easy Steps 1. Consider the Size of Your Mattress The most important factor to consider when choosing a bed frame is the size of your mattress. Bed frames come in various sizes, including Twin, Full, Queen, King, and California King. Make sure to measure your mattress and choose a bed frame that matches its dimensions. If you’re purchasing a new mattress and bed frame, consider investing in a larger size to ensure maximum comfort. 2. Choose a Style that Complements Your Bedroom Decor Bed frames come in a variety of styles, such as platform, canopy, sleigh, and storage. Consider the overall style of your bedroom when choosing a bed frame. A sleek and modern platform bed frame may be the perfect addition to a contemporary bedroom, while a classic sleigh bed frame would work well in a traditional space. Don’t be afraid to mix and match different styles, but make sure they work together cohesively. 3. Decide on the Material of the Bed Frame Bed frames can be made from a variety of materials, including wood, metal, and upholstery. Each material offers different benefits and drawbacks. For example, a wooden bed frame is durable and provides a natural aesthetic, but may require more maintenance than a metal bed frame. A metal bed frame is lightweight and easy to move, but may not offer the same warmth as a wooden frame. Consider your personal preferences and lifestyle when deciding on the material for your bed frame. 4. Assess Your Storage Needs If you’re short on closet space or prefer to keep your belongings in your bedroom, consider a bed frame with built-in storage. Storage bed frames typically have drawers or shelves built into the base of the frame. This can be a great option for maximizing space in a smaller bedroom. However, keep in mind that storage bed frames may be more expensive than traditional bed frames. 5. Think About Your Physical Needs If you have specific physical needs, such as back pain or mobility issues, consider a bed frame that meets those needs. Adjustable bed frames allow you to change the angle of the head and foot of the bed, making it easier to find a comfortable position. Bed frames with a higher clearance may be easier to get in and out of for those with mobility issues. Don’t overlook the importance of choosing a bed frame that can accommodate your physical needs. When To Change Your Bed Frame? 1. Structural Damage One of the most obvious signs that it’s time to change your bed frame is if there’s any structural damage. A wobbly and unstable bed frame can lead to discomfort and interrupted sleep. If you notice any cracks on the bedposts or slats, it’s a telltale sign that your bed frame has reached the end of its lifespan. Structural damage can also affect your mattress, which can cause further discomfort and sleeplessness. Don’t risk your well-being by sleeping on a faulty bed frame. Invest in a new one as soon as possible. 2. Sagging Mattress If you’ve been using the same bed frame for several years, you might notice that your mattress has started to sag in the middle. This occurrence is expected over time, especially if you don’t have a supportive bed frame. A worn-out bed frame can no longer provide adequate support to your mattress, leading to its sagging. You may have tried rotating or flipping your mattress in hopes of correcting the issue, but it’s time for a new bed frame. A new bed frame can provide proper support to your mattress, giving you a restful sleep. 3. Uncomfortable Sleeping Experience Do you often find yourself waking up to back pains and aches? Your bed frame might be contributing to your discomfort. An old bed frame can no longer provide enough support to your body, leading to poor sleeping posture and discomfort. Your bed frame should be at the right height for you to get in and out of bed easily. Moreover, it should be sturdy enough to support your mattress and distribute your weight evenly. If you notice that your bed frame no longer provides these benefits, you should consider getting a new one. 4. Change in Bedroom Decor Changing your bedroom decor can also influence your decision to get a new bed frame. A change in paint color, curtains, or flooring can make your current bed frame look out of place. A bed frame that no longer matches your bedroom decor can make your sleeping space look messy and less appealing. If you’re looking to enhance the overall look of your bedroom, it might be time to update your bed frame. 5. A New Lease on Life Finally, you can choose to change your bed frame for the sake of change. Maybe you’ve been using the same bed frame for years, and you want to switch things up. A new bed frame can give you a fresh perspective on your sleeping space and provide a much-needed change of scenery. Additionally, a new bed frame can be the perfect opportunity to upgrade your mattress and pillows. Conclusion Choosing the right bed frame is essential for creating a comfortable and functional bedroom. By considering the size of your mattress, the style, material, storage needs, and physical needs, you can select a bed frame that suits your personal style and lifestyle. Don’t rush the decision-making process, as this is an investment that you’ll be using

How To Choose The Right Bed Frame? Complete Guide! Read More »

How To Choose A Mattress

How To Choose A Mattress? This Is How!

When it comes to selecting the optimal mattress to enhance your sleep quality, there are several crucial considerations to keep in mind during the purchasing journey. Determining the right mattress involves more than just adhering to your budgetary constraints. It is essential to take into account various significant construction factors that can profoundly affect the comfort and performance of the bed tailored to your specific needs.  Moreover, given the multitude of available mattress options, being equipped with the knowledge of what to look for will aid in streamlining your decision-making process. Let me guide you through the steps of effectively choosing a new mattress, while highlighting the key aspects that warrant your attention throughout the entire buying process. Related Article: How To Clean Your Mattress? What To Look For In A Mattress? When embarking on your mattress shopping journey, it is crucial to keep in mind that not all mattresses are created equal. Take the time to acquaint yourself with the various types available: No matter which mattress type you choose, quality materials are paramount. They not only enhance comfort but also contribute to the longevity of the mattress. Look for features like a robust base crafted with higher-density foam for stability and specific layers designed to provide comfort and support. Furthermore, consider cooling materials if you tend to overheat during sleep. Opt for mattresses with breathable covers and innovative elements such as charcoal-infused gel foam, which aids in heat dissipation and promotes healthier airflow. By thoroughly considering these factors, you can make an informed decision when selecting a mattress that will cater to your specific needs and preferences. How Does Your Body Affect Your Mattress Choice? Selecting the right mattress firmness depends on several factors unique to each individual, including weight, height, age, and overall health. Consider the following guidelines as a general reference when determining the appropriate firmness level. Additionally, it’s important to remember that most high-quality mattresses offer a risk-free trial period, allowing you to personally experience and evaluate its suitability for you. Those with specific physical health issues like arthritis or fibromyalgia should prioritize a mattress that promotes proper spinal alignment to prevent tension and pain. Consulting a healthcare professional for guidance on selecting a mattress that accommodates your health needs is advisable. Orthopedic mattresses may be a suitable option for addressing these requirements effectively. Remember, choosing the right mattress is a personal decision that involves considering various factors. Take advantage of trial periods and professional advice to find the optimal mattress that meets your specific needs. How Does Your Sleep Style Affect Your Mattress Choice?  When selecting a mattress, the sleeping position is a crucial aspect to consider. Whether you sleep on your back, front, side, or a combination, each position has specific requirements. Take a look at this comprehensive guide, which highlights the mattress types that work best for each sleeping position: By taking into account your specific sleeping position, you can choose a mattress that not only supports your body but also enhances your overall sleep quality. How To Choose A Mattress For Back Pain When it comes to choosing a mattress for back pain, a medium-firm option is generally recommended. This type of mattress provides adequate support for the natural curves of your spine while allowing your shoulders and hips to sink in slightly for added comfort. In addition to support, it is important to look for good-quality materials such as springs and coils that offer proper support. However, it is crucial to pair these elements with a top layer that provides enough give to alleviate pressure points. Another consideration is selecting a mattress with cooling top comfort layers, especially if you tend to sleep hot. This can help prevent exacerbating your back pain as you toss and turn to find a comfortable position. Firmness is a key factor to consider as well. It is not recommended to sleep on a mattress that is too soft as it can cause various points of your body to sink too far and result in misalignment of your spine.  On the other hand, a mattress that is too firm may not provide the necessary cradling effect. Ideally, you should find a mattress that offers a comfortable balance between support and give, ensuring you are properly supported while still experiencing some degree of cradling. How To Choose A Mattress For Kids And Babies As children grow, their need for sleep increases compared to adults. Sufficient sleep is crucial for the healthy development of their bones, muscles, and joints. Therefore, providing a comfortable bed is essential. However, when choosing a mattress for babies and children, there are important safety considerations to keep in mind. Contrary to what may seem intuitive, newborns and toddlers require a firm mattress. A mattress that is too soft can be extremely dangerous if the infant sinks in too much. Hence, using a firm mattress during the first few years of a child’s life is highly recommended.  Additionally, mattresses for kids must meet strict safety regulations, such as CPSC standards in the US or British Safety Standards in the UK, so it is essential to check for compliance before making a purchase. In addition to safety, it is important to ensure that a child or baby’s mattress fits securely in their cot or bed. Adequate ventilation is also necessary to keep the infant cool, dry, and comfortable. Many toddler and baby mattresses come with wipe-clean or removable covers that can be washed at high temperatures, minimizing the accumulation of bacteria. Similar to adult beds, investing in the highest quality crib mattress within your budget is ideal to ensure both quality and safety. Notably, Purple and Saatva offer plush children’s mattresses that provide the utmost comfort for little ones to sleep on. In conclusion, prioritize the well-being of your child by selecting a suitable mattress that meets safety standards, offers firm support, and promotes comfort and hygiene. How To Choose A Mattress For A Guest Room Final Words Choosing the right mattress is

How To Choose A Mattress? This Is How! Read More »

Scroll to Top